Table of Contents
Lights
The TCB has five dedicated light outputs:
- Aux General purpose light with advanced features, see Aux Output page.
- L1 (Light 1 / headlights)
- L2 (Light 2 / second machine gun)
- BRK (Brake/running lights)
- MG (Machine Gun light)
Because the Aux Output has many other special features besides just the ability to turn a light on and off, it is discussed on its own page.
Light 1
Light 1 has three Functions that can be triggered: on, off and toggle. Light 1 can be used for any on/off light, but it has the option of automatically triggering the special headlight sound whenever its status changes. See the Sounds tab of the OP Config program for this setting.
Light 2
Light 2 has three Functions that can be triggered: On, Off and Toggle. Additionally if you choose to implement a second machine gun you will plug the second machine gun LED into the Light 2 port.
Brake Lights
The Brake light doesn't need a specific trigger assigned to it - it will automatically turn on when the vehicle is braking. If you have a very low deceleration setting there may not be much opportunity to engage the brake as the model is likely to come to a stop very quickly.
In addition to auto-on while braking, there are some advanced options you can set on the Lights & IO tab in OP Config.
- You can choose to have the brake light come on automatically whenever the vehicle is stopped.
- You can also use the brake lights as “Running lights” which is simply the light on at some level less than full brightness. You can specify what this brightness level should be in OP Config. You can then choose to have the running lights always on, or you can assign a trigger to one of the Running Light Functions (on, off, or toggle). Either way, the brake light (full brightness) will always over-ride the running light (partial brightness), but only when braking occurs.
Machine Gun Light
Any light plugged into this output will flash when the machine gun function is triggered. The flash rate can be set in the OP Config program on the Lights & I/O tab.
Choosing and Installing Lights
Recommended LEDs
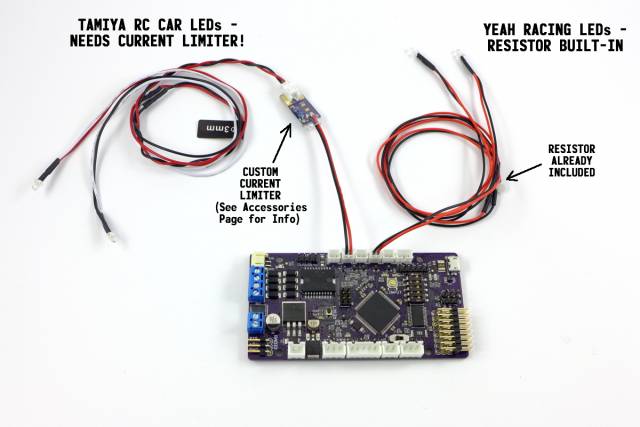
We highly recommend the Yeah Racing brand LED Light Sets (LK-0008 and LK-0009 series). They are inexpensive, widely available, plug directly into the TCB, and best of all already come with the correct current limiting resistor installed. They come as a string of two LEDs and they have red, orange, yellow, blue, green, and white in both 5mm and 3mm LED sizes.
Tamiya sells a wide range of LEDs as hop-up parts for its RC cars that will plug directly into the TCB, but they do not come with current limiting resistors and will burn out if you don't add them to the wiring yourself. They also cost substantially more than the Yeah Racing brand.
If you wish to use another brand of LEDs or create your own, continue reading.
Connector
Each light output on the TCB utilizes a 2-pin JST-PH connector. This connector is very common for pre-made LED lights used for RC cars, but you can also buy pre-made pigtails very cheaply for creating your own cables - simply do a search on eBay for JST PH 2 pin connector.
Note that most of the eBay sellers will have the red and black wires opposite of what makes sense on the TCB. LEDs require a certain polarity so be sure you wire them correctly. For your convenience, positive and negative are printed on the bottom of the TCB board for every single output.
Current Limiting
There is no current-limiting implemented on the TCB's light outputs. If you are using small incandescent bulbs (such as grain-of-rice bulbs or grain-of-wheat bulbs), this doesn't matter. Just try to select a bulb that operates at 5 volts. But most people will want to use an LED, and most LEDs are not rated for 5 volts. If you use the recommended LEDs listed above, you don't have to worry about it, they already come with a current-limiting resistor installed. Otherwise, it is up to you to install the correct current-limiting resistor in your LED wiring!
There are many online calculators to help you determine the value of this resistor if you know the specifications of your LED - here is one. The value for “Supply Voltage” in the calculator will of course be 5 volts. If you don't know the specs on your LED, typical values are 2.1 volts for the “Voltage Drop” and 20 mA for the “Desired LED Current.”
Or if you just like to guess, a 150 ohm resistor should be sufficient for most common single LEDs, or use a 100 ohm resistor for two LEDs wired in parallel.
See the Accessories page for information on some convenient plug-and-play inline current limiters that you can build.
Max Current
The TCB's onboard 5 volt circuit can supply up to 3 amps total, spread across all 5 volt devices plugged into the TCB. The MOSFETs used for the light outputs can easily handle 3 amps each, but if you actually try to run a 3 amp light you would have no current left for running the onboard IC or anything else. Also keep in mind the JST-PH connectors themselves are only rated at 2 amps each. If you are running typical LEDs at typical currents (10-20mA per LED), then you don't need to worry about exceeding the maximum current supply of the TCB even if you have multiple LEDs plugged into every port. However if you want to drive high-current, super bright lights, keep these limitations in mind. If you really need to drive a high current device, the Aux Output is capable of driving a 5 volt relay and that would probably be the better approach to take.
