Table of Contents
Driving Adjustments
The settings on this tab all impact the manner in which the vehicle moves.
Engine and Transmission Basics
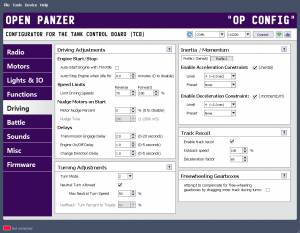 Although in reality the electric motor(s) in your model can be energized at any time, and there is no “neutral” gear in the gearbox unit, the TCB creates an “engine” and “transmission” in software. Before the TCB will allow your model to move, the engine must be “started” and the transmission “engaged.” In addition to adding realism, this arrangement has several other benefits as we shall see. Let's take this step-by-step. To begin moving your vehicle:
Start the engine. You can assign a trigger to the start engine function, or have it automatically occur with throttle input (see the setting below).
When the TCB "starts the engine" it directs the engine startup sound to play and sets the Smoker to Fast Idle speed. It begins a timer for the length of time you specify below (Transmission Engage Delay) and when that time expires, for your convenience it automatically engages the transmission. This delay is useful to prevent your model from moving while the startup sound is still playing.
At the moment when the transmission is engaged, the Smoker speed is reduced from Fast Idle to Idle (see the Motors tab for Smoker speed settings).
Throttle movements will now result in vehicle movement.
At any time you can choose to disengage and re-engage the transmission by assigning a trigger to those functions. While the transmission is disengaged you can still manipulate the throttle. When you do so, the engine sound will speed up, as will the Smoker speed, but the tank will not move. It is just like pressing the gas pedal in your car while in neutral.
At any time you can turn off the engine by assigning a trigger to that function, or enabling the setting that automatically turns it off after a set amount of time at idle (see below). When the engine is turned off the motor shut-down sound plays, the smoker stops, and the tank ceases all movement. However even when the engine is stopped, you can still control the turret, cannon, and machine gun.
Driving Adjustments
Engine Starting and Stopping
Auto-Start Engine with Throttle
 If you don't want to assign a trigger to turn on the engine, you can enable this option. The engine will automatically be started the first time you move the throttle forward (throttle stick must be moved to more than half throttle). CAUTION: be careful when using this setting with large scale or heavy models! It will be very easy for you to accidentally bump the throttle stick and have your model go running off the bench.
Auto-Stop Engine when Idle
If you would like the engine to automatically turn off after the tank has been sitting idle for some length of time, specify the time here in minutes. This can be useful if you don't want to assign a trigger to the engine off function. If set to zero (0) the effect is disabled and your tank will idle for as long as you let it (or until Low Voltage Cutoff is reached, see the Misc tab).
Speed Limits
Limit Driving Speeds
 This option lets you modify the maximum allowed forward and reverse reverse speed as a percent of full speed. A full speed setting of 100% will allow your model to move as fast as its hardware will allow. This is a function of your motor, battery, gearbox, etc. To limit the maximum speed, specify a value less than 100%. You can have different maximum speeds for forward and reverse.
Nudge Motors on Start
Much effort has gone into programming the TCB so that we can control our models in a realistic manner. Everyone is aware of what the stock Heng-Long driving experience looks like, and it's not realistic. The best way to improve the appearance of our vehicle's movement is by setting acceleration and deceleration constraints (discussed below). But at high inertia levels (meaning the vehicle accelerates slowly), driving may be smooth but starting from a stop can suffer. We may be required to give large throttle commands to get the vehicle started, the vehicle may then start moving faster than we had wanted it to, and the feeling of throttle responsiveness at low throttle settings can decrease. That is because it takes more power to overcome the resistance of a stationary gearbox and drivetrain, than it does to keep those things moving once they've started. The Nudge feature was created to address this issue.
A “Nudge” only occurs when the tank has been stopped and is first starting to move (either in forward or reverse). If enabled, Nudge will apply a certain minimum throttle setting for a specified length of time that over-rides any acceleration constraint. It also over-rides any speed limitation that may have been set above! It is up to you to choose a nudge amount that makes sense. If your max forward speed is set to 70%, a nudge amount of 90% may look odd. When the Nudge Time is over, throttle response will revert to whatever constraint has been applied. A Nudge will not be applied again until the vehicle has once again come to a stop.
If you are not using any acceleration constraint, or the level is very low, you may not need any Nudging. If so, disable Nudge by setting the percent to 0. Otherwise, a good starting point for testings is 30% Nudge for 250-500 mS (1/4 - 1/2 of a second). Adjust from there to fit your model and driving preference.

Motor Nudge Percent
This is the minimum throttle that will be applied during the nudge. For as long as Nudge Time lasts, the throttle will instantly be set to Nudge Percent and kept there, regardless of any acceleration/deceleration constraint and regardless of any forward/reverse speed limit that may also have been set. Set to 0 to disable the Nudge effect.
Nudge Time
This is how long the Nudge effect will last in milliseconds when movement first begins from a stop (1000 mS = 1 second).
Driving Delays
Transmission Engage Delay
 This delay is the length of time from when the engine is first started to when the TCB automatically engages the transmission as a convenience to the user. This delay should be at least as long as your engine startup sound clip, to prevent the vehicle from moving while the startup sound is still playing. Setting is in seconds. Note: this setting also determines the length of time the Flicker Lights during Engine Start effect will last, if that is checked on the Lights & IO tab.
Engine On/Off Delay
This delay will be the minimum length of time that must pass before the engine can be turned on after being turned off, or turned off after being turned on. If you turn the engine on and off back and forth too quickly, it is possible for the sound unit to become out of sync - you may find the engine sound playing when the engine is off, and no sound playing when the engine is on. This setting can help you prevent that, but if it does happen, simply reboot the TCB by pressing the RESET button on the board, or just cycle power to the board and the issue will resolve itself. Setting is in seconds.
Change Direction Delay
This setting is intended to help prevent unnecessary wear on your gearbox. If set to 0 (disabled), and if acceleration and deceleration constraints are disabled, it will be possible to change direction from forward to reverse (or vice versa), instantaneously. This can be very hard on the gearbox not to mention the drivetrain and your model generally. Set a delay here to prevent this sort of whiplash from happening. The delay will represent the amount of time your model must be stopped before it can change direction from forward to reverse or vice versa. Setting is in seconds.
Turning Adjustments
Turn Mode
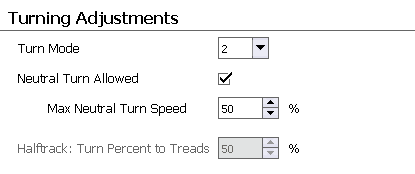 There are three turn modes possible for Tanks and Halftracks (these do not apply to Cars or tanks with clutch-style gearboxes like the DKLM RC PDSGB). You can set the mode here, but you can also change the mode during operation by assigning triggers to the turn mode functions. A 3-position switch works well for this, and lets you quickly experience the difference between each mode so you can determine your preference.
- Turn Mode 1: Most simple, and also most similar to the way full size tanks actually turn. In this mode, the turn command is subtracted from the inner track only - the outer track maintains drive speed. Think of it as a brake on the inner track.
- Turn Mode 2: Similar to Mode 1 in that the turn is subtracted from the inner track only, but now we mix a bit of the steering input into the throttle command as well. In other words, as the turn command increases, so does the total drive speed. Think of it like this: every time the driver decides to turn, he also decides to step on the gas by the same amount that he is turning. This is not entirely realistic but it does makes for smoother driving, because the tank is not slowing down with every turn as it does in Mode 1.
- Turn Mode 3: This is a milder version of Mode 2. Instead of increasing speed across the board during turns, we divided the turn in half, and split the difference across the tracks. Half of the turn is applied as an increase to the outer track, half is applied as a decrease to the inner track. The nice side-effect of this mode is that the model has a tighter turning radius at slow speeds than at high speed, which accurately reflects what would happen with a full sized vehicle.
Neutral Turn Allowed
A “Neutral Turn” is when a tank rotates each track in opposite directions at the same speed. You may have heard this called “super spin.” The result is that the tank rotates in place without moving forward or backwards. Obviously this option is not available for Halftracks or Cars. Not all tanks in real life have the ability to do neutral turns, so you can enable or disable this feature as you wish.
Note: There seem to be as many ways to produce a neutral turn as there are manufacturers of tank electronics. Here is how you do it with the TCB:
- First, the tank must be at a stop. You can not enter a neutral turn while the tank is moving.
- Do not give any forward or reverse command.
- Move the steering stick left or right while maintaining zero throttle to begin turning in place. The more you hold the stick to the left or right, the faster the neutral turn will be.
- You can not start moving forward or reverse while turning in place. First you must let the tank come to a stop - then you can proceed with forward or reverse movement.
Max Neutral Turn Speed
The term “super spin” was coined to describe the Heng-Long version of a neutral turn, which basically spins the tank around at tremendous speed like a top. This is undoubtedly very cool, but couldn't be less realistic. If you want the ability to do neutral turns but also don't want your tank to spin like a whirling dervish, set a max Neutral Turn Speed here to some lower percentage.
Halftrack: Turn Percent to Treads
This setting only applies to Halftracks with independent rear tread motors. Any turn command will always be applied to the steering servo (front wheels). But you can also choose to have some or all of the turn command applied to the rear treads as well, to aid in steering. Any turn command applied to the rear treads will be subject to the current Turn Mode.
Inertia & Momentum
Inertia is a force that operates against an object trying to accelerate. In real life a tank that weighs many tons can not accelerate immediately from a stop to full speed, but a lightweight plastic model that is vastly overpowered can.
Momentum is the tendency of an object in motion to stay in motion. Momentum is what causes heavy vehicles to coast to a stop. But a small model tank will stop instantly if you let off the throttle.
Without any effective inertia or momentum a model tank looks very unrealistic when driven, or “toy-like.” We can change that by simulating the effects of inertia and momentum in software. You may have heard some people call this “tank physics.” We prefer to use the terms “Acceleration Constraint” and “Deceleration Constraint.” The acceleration constraint is a limit placed on the speed at which the vehicle can accelerate. The deceleration constraint is a limit placed on the speed at which the vehicle can decelerate.
The acceleration and deceleration constraints can be set individually, or disabled completely. You can also adjust the level of constraint on the fly by assigning an analog trigger to those functions.
The simple way to adjust these constraints is to set their level. The constraint level can vary from 1 to 14. Each level represents an increase in approximately 1/2 second of time that it would take the vehicle to accelerate from a full stop to full speed (acceleration constraint), or to coast to a complete stop from full speed (deceleration constraint).
For example, if you set the acceleration constraint to Level 4, that would be (4 * 1/2 second) = 2 seconds that it would take the vehicle to accelerate from a complete stop to full speed. If you set the deceleration constraint to Level 14, that would be (14 * 1/2 second) = 7 seconds that it would take the vehicle to coast to a complete stop from full speed.
Level 1 is the minimum constraint and it represents a delay of only 1/2 second. The effect will hardly be noticeable, and any less than that you might as well disable the constraint completely.
In addition to the constraint Level, you can also specify a constraint Preset. A preset is a further refinement of the constraint Level. At the time of release presets are considered experimental, and some presets may do nothing. The idea behind a preset is to adjust the constraints dynamically as a function of other conditions. Instead of having a static constraint that prevents the vehicle from accelerating faster than a fixed amount of time, a preset might allow faster acceleration at slow speeds, or when the instantaneous throttle command is more than a certain percentage above the current speed. Rather than linear deceleration, a preset may simulate logarithmic deceleration - slow at first, but gradually increasing as speed decreases. A preset could take the Level you specify as a base from which to modify, or it could overwrite your chosen level completely.
These are just some examples of what presets might be capable of, but they need more development. As presets are created, this page will be updated.
Note: Even if you set the deceleration constraint level very high, you can always stop your tank immediately by applying full opposite throttle (emergency brake). For example, assume your tank is moving forward at full speed, and you set the deceleration constraint level to 14 (meaning it will take 7 seconds to coast to a stop). If you return the throttle stick to center, the tank will begin coasting to a stop. If you move the throttle stick slightly in the opposite (reverse) direction, you will start to apply brake. The brake lights will come on and the rate of deceleration will increase. The further back you hold the stick, the more brake will be applied. But if you hold the stick all the way reversed, no matter what Level or Preset or speed you are going, the tank will always stop immediately. (The same thing is true for a tank moving in reverse - simply apply forward to brake, and full forward to stop immediately.) In other words, even though your tank may coast for a very long time, you can always prevent running into obstacles by hitting the emergency brake.
Profile 1 & 2
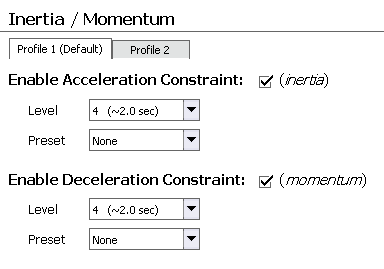 There are two complete collections of inertia and momentum settings called Drive Profile 1 and Drive Profile 2. You can define each differently and then switch between the two profiles using one of the Drive Profile Functions. If you don't assign a trigger to change the profile, the TCB will always default to Profile 1.
Acceleration Constraint
Enable Acceleration Constraint: Check this box to enable the constraint. If un-checked, your vehicle will move as fast as your thumb can move the throttle stick.
Level: Set the acceleration constraint level. Remember, each number represents approximately an extra 1/2 second of time that it will take your vehicle to accelerate to full speed from a complete stop.
Preset: Select an acceleration preset, or select None if you just want to use the Level by itself.
Deceleration Constraint
Enable Deceleration Constraint: Check this box to enable the constraint. If un-checked, your vehicle will stop instantly when you return the throttle stick to center, with no coasting.
Level: Set the deceleration constraint level. Remember, each number represents approximately an extra 1/2 second of time that it will take your vehicle to coast to a stop from full speed.
Preset: Select a deceleration preset, or select None if you just want to use the Level by itself.
Track Recoil
Enable Track Recoil
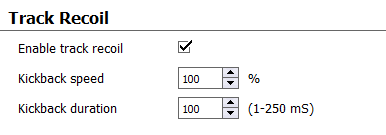 Track recoil will cause the vehicle to move backwards briefly when then cannon is fired. This feature is standard on Heng Long and Taigen tanks, but most find it undesirable for scale reasons. Here you can enable or disable it as you please. Note: the Open Panzer implementation of track recoil is only active when the vehicle is stopped - even if enabled, it will not function if the cannon is fired while the vehicle is moving. Also keep in mind that the effect will be influenced significantly by your specific gearbox and motor combination. In general, the very high gear ratios used in model tanks do not permit for a very realistic reaction.
Kickback Speed
The reverse motor speed of the track recoil movement, from 1 to 100%.
Deceleration Factor
The duration of the track recoil effect in milliseconds (ms). Maximum is 250 mS which equates to 1/4 of a second.
Freewheeling Gearboxes
 Certain gearboxes such as the notorious Taigen “V2” Steel 3:1 and 4:1 gearboxes don't have adequate internal friction to keep from free-wheeling when any kind of external force is applied to them. This is a big problem in a vehicle such as a tank that requires the speed of one track to be slower than the other in order to steer or turn. Most speed controllers reduce the speed of a motor by simply reducing the voltage to the motor, but if spins too easily the other track will simply drag it along and no steering will be possible. This inability to turn all but renders these gearboxes useless and the effect is most pronounced in heavy models with wide tracks such as the King Tiger, Jagdtiger, Panther, Jagdpanther, etc… You may find they keep on driving straight ahead even when only a single track is powered - sometimes the only way to turn them is to come to a complete stop and perform a spin turn.
If you encounter this issue the best option may be to upgrade to a better gearbox, but this can be expensive. If you are using the Scout ESC you can enable this option and it will attempt to proportionally drag the slower (inner) track during turns by pulsing that motor with brief brake commands many times per second. In somne cases this can solve the freewheeling issue, but results may vary by the weight of your specific model and the gearbox you are using.
If you don't have problems turning or steering, leave this option unchecked.
Also remember this option will only be enabled if the selected Vehicle Type on the Motors tab is set to Tank or Halftrack, and only if the Drive Motor type is set to Scout ESC.
Onboard Red & Green LEDs for Troubleshooting
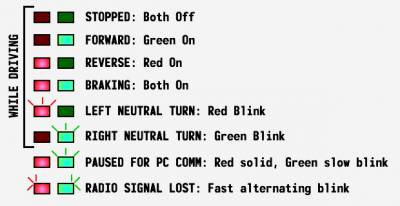 You can use the onboard Red and Green LEDs to verify that your board is responding properly to your radio. While driving, the Green LED indicates forward movement, the Red reverse movement, and both on at once indicate braking. The LEDs are off when stopped. When performing neutral turns, the Green LED blinks during turns to the right and the Red LED blinks during neutral turns to the left (if neutral turns are enabled). When not driving, a solid Red LED indicates the TCB is not in normal operation mode: either because it is still booting up, or because the user has entered a Special Menu, or because it is paused in order to communicate with a PC. In Special Menus the Red LED will remain solid and the Green LED may blink to indicate certain information or steps. When communicating with the PC, the Red LED will remain solid and the Green LED will blink slowly.