Table of Contents
Motor Selection
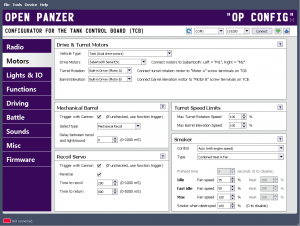
 On this tab you will specify how you want to power the main drive motors as well as the two turret motors (one for turret rotation, and one for barrel elevation). As you make your selections in the OP Config program, you will see next to them helpful notes about where to plug in your motor, speed control, or servo. For more information on wiring these devices to the TCB, see the Motor Control Options page.
Also on this tab you can set options for the “mechanical barrel,” which means either a mechanical recoil unit or airsoft unit. You can also set options for a recoil servo if you intend to use one instead of mechanical recoil, and finally you will also see options related to smoke units.
Drive and Turret Motors

Vehicle Type
There are three possible vehicle types, each with slightly different drive motor considerations. Select the one that matches your model:
- Tank: Tanks have two independent drive motors. Steering is accomplished through differential control of these motors.
- Tank - DLKM style: This type of tank only has a single drive motor, steering is accomplished with a second motor through a clutch-style gearbox such as the DKLM RC Propulsion Dynamics Steel Gearbox (PDSGB).
- Tank - Tamiya DMD: Select this option if you have a Tamiya DMD (T-01, T-03, T-08) which is just a dual brushed speed controller with built-in mixing.
- Halftrack: Halftracks also have two independent drive motors. Steering is accomplished both through differential control of the drive motors and through a steering servo attached to the front wheels. (The proportion of steering applied to the treads and the servo can be adjusted on the Driving tab under the Turning section.)
- Car: A car has a single drive motor. Steering is accomplished through a steering servo. You could also use this mode for halftrack models that do not have independent tread motors.
If you select Halftrack or Car, you will have a steering servo involved. This servo must be plugged into RC Output 2 (also labeled Right on the TCB). In the case of a Halftrack, because the steering servo is occupying the output that would typically be allocated to the “right” tread, the Halftrack drive motors must be driven by a dual-serial motor controller or the onboard motor controllers. In other words, it is not possible to use two hobby ESCs in Halftrack mode (but you can use hobby ESCs for all other modes).
Drive Motors
This is where you select how you want to power the main drive motor(s). For Tanks and Halftracks, there are always two drive motors, for Cars there is only one. You have three basic options:
RC Output: Select this if you intend to use a standard RC electronic speed control (ESC), or if you plan to use a continuous-rotation servo as the actual drive motor. The ESC/Servo for the Left tread should be plugged into RC Output 1 (also labeled Left on the TCB) and the ESC/Servo for the Right tread should be plugged into RC Output 2 (labeled Right on the TCB). If this is a car with only a single drive motor, plug it into RC Output 1.
Warning: Almost every hobby ESC today includes a BEC (battery eliminator circuit) - this includes the Tamiya DMD! The purpose is for the ESC to provide 5v power to the radio receiver and subsequently the servos in a typical hobby application (which "eliminates" the need for a separate receiver battery). However, because the TCB already has its own 5v supply, you MUST disable the speed control's BEC before plugging it into the TCB, or you could damage one or both devices!
Disabling the BEC is very simple, you only have to remove the center pin of the speed control plug (typically red or orange in color). The pin can be replaced later if you decide to use the speed control for some other project, so it is not destructive in any way. Here's how:

If you are using a continuous-rotation servo then you can leave all three wires in the servo cable intact - the TCB will provide 5v power to the servo. But remember, the TCB can only source a total of 3 amps to all 5 volt devices attached, including servos, so only use continuous rotation servos for drive motors on very small and lightweight models.Built-in Driver: The TCB includes an integrated dual motor controller that can supply up to 2 Amps per motor. Motors are connected via screw terminals labeled Onboard Motors A & B. Again, 2 amps is not sufficient for main drive motors on 1/16th scale models, so only use this option for drive motors on small, lightweight models. The motor for the Left tread should be plugged into Terminal A, and the motor for the Right tread into Terminal B.
Serial ESCs: The final option for controlling the drive motors is to use a dual-motor serial ESC. These ESCs are designed to drive two motors from a single unit, making them ideal for tanks and halftracks. They are controlled with a digital serial protocol that only requires a two-wire cable - plug this cable into the dedicated connector on the TCB, labelled MOTOR SERIAL. The TCB supports the Open Panzer Scout ESC, the complete line of Dimension Engineering Sabertooth controllers, and the Pololu Qik series. Support for other serial controllers may be added in time, see the Serial Motor Controllers page in the Installation section for up-to-date information.
For most applications we find the serial motor controllers to be the superior option over hobby ESCs. You only need a single unit to drive both motors instead of two ESCs, and the price is often less. They take up less room and require less wiring. The Sabertooth and Qik series both operate at ultrasonic frequencies, so no annoying motor whine. They have models ranging from miniature (Pololu Qik 2s9v1) to the massive (the Sabertooth 2x60 would easily power a 1/6 scale model), and everything in-between (the Sabertooth 2x5 is suitable for all but the heaviest 1/16th scale models). The one advantage hobby ESCs have is the ability to use brushless motors. The choice is up to you!HECLO SHIELD ONLY! - Built-in Drivers C & D: This option should only be selected if you are using the special Heclo Shield, these drivers do not exist on the regular TCB. The Heclo Shield has two additional on-board drivers labelled C & D, they can provide up to 30 amps per motor which should be suitable for all 1/16 scale models. For more information on the Heclo shield design please read this thread. Note: If you select this option and load the firmware to a board other than the Heclo shield, the selection will automatically be changed to Sabertooth Serial ESCs.
Turret Rotation Motor
The same options exist for the Turret Rotation Motor as for the main drive motors listed above, with the addition of one more: Detached. When selecting the Detached option, the turret stick will no longer control the turret rotation motor. This does not affect the ability of the turret stick to be used as a function trigger. You can use this option if your tank does not have turret rotation (tank destroyer) or if you intend to manually control the movement by some other channel.
Turret Elevation Motor
The Turret Elevation Motor has all the same options as the Turret Rotation motor, with one extra called Servo - Pan Effect. This one assumes that barrel elevation will be controlled by a standard, unmodified hobby servo (not a continuous-rotation servo, and not a hobby ESC). The “pan effect” describes the way in which transmitter stick movements will be translated to servo movements. If you select the RC Output option and use a standard servo, the servo movement will be as you expect - it will match the stick movement. When the stick is at the center, the servo is stationary in the center position. As you move the stick one way or another, so the servo will move one way or another, and return to center when you let go of the stick. With the Pan Effect the servo will respond differently. Stick movements will actually be converted to speed commands, not absolute position commands. If you move the stick a very small amount in one direction, the servo will start moving very slowly in that direction and keep moving in that direction until you return the stick to center. Stick centered means “zero speed,” but it does not mean the servo will return to center. For that you will have to move the stick in the opposite direction to bring the servo back. The farther away from center you move the transmitter stick, the faster the servo will move in the specified direction. When the servo reaches its mechanical limit, it will stop. If this explanation is hard to follow you can watch this video to see a demonstration of the difference. Or try both RC Output and Servo - Pan Effect with a standard servo and quickly experience the difference yourself.
Note: If you do select a servo for turret elevation, you may also want to set custom end-points on your servo travel. But because the radio's turret stick is used for more than direct control of the turret motors, it is not practical to use the transmitter's end-point settings to do so. Never fear, you can do it much more easily using the TCB's servo-setup menu, see the Barrel Elevation Servo page for more information.
Mechanical Barrel
 The term “mechanical barrel” refers to the use of either a mechanical recoil unit (such as the Tamiya or Asiatam/Taigen units), or the use of an Airsoft unit. You can not choose both. If you wish to use Airsoft and recoil, set the Mechanical Barrel to Airsoft and then use a servo mechanism for the recoil action (see below for more on recoil servos).
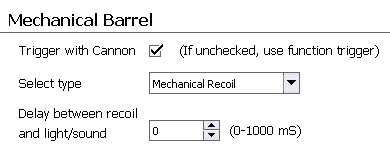
Trigger with Cannon
If checked, the mechanical recoil or airsoft unit will automatically be triggered when the Cannon Fire function is called. If unchecked, a new function Fire Airsoft / Mechanical Recoil Unit will be added to the Function List, which will allow you to trigger the airsoft or mechanical recoil unit manually.
Select Type
Select either Airsoft or Mechanical Recoil.
Note: although the TCB is compatible with most popular recoil and airsoft units, some changes in wiring will probably be necessary. Tamiya recoil units are the exception, they are plug-and-play but will need an adapter as they use a non-standard plug. Wiring diagrams and instructions are available on the Airsoft and Mechanical Recoil pages.
Delay Between Recoil and Light/Sound
This option is only available if you select Mechanical Recoil as the type. It allows you to specify a delay in milliseconds (1,000 mS = 1 second) between the time when the barrel recoil unit is activated, and when the flash and sound effects occur. You can use this to more closely synchronize the cannon effect. If you don't need a delay just set the value to 0 and the recoil, flash, and sound will all occur at the same moment.
Turret Speed Limits
 The speed limit setting will work on all motor types, except for an unmodified hobby servo with the motor type set to “RC Output.” In that case, because the signal being sent to the servo is actually a position command, any speed limitation settings will instead decrease the servo's end-points.
For all other types of motors and outputs, the speed limitation will work as expected.
If you want to use a standard, unmodified hobby servo for barrel elevation, you should select “Servo - Pan Effect” as the motor type and not “RC Output.” Not only will you have finer control of the barrel movement, but the pan effect code will allow this speed limitation setting to work as expected (it will restrict the maximum speed at which the barrel servo can move).
If you want to use a servo for any other control, such as turret rotation or even as a drive motor, then you can use “RC Output” but you must use a hobby servo modified for continuous rotation. Continuous rotation will probably be necessary anyway for those controls, but one side effect of that modification is the signal sent to the servo now functions as a speed command instead of a position command, so any speed limitation setting will now work as expected.
Max Turret Rotation Speed
If you wish to limit the speed of the turret rotation motor, set this to some number less than 100.
Max Barrel Elevation Speed
If you wish to limit the speed of the barrel elevation motor, set this to some number less than 100.
Smoker
 The TCB is compatible with Heng-Long style smoker units or any unit that requires nothing more than a variable voltage. You do not need a special “proportional” smoker, the TCB takes care of the smoker speed internally whenever you advance the throttle. For further information on hardware see the Smoker page in the Installation section.
Control
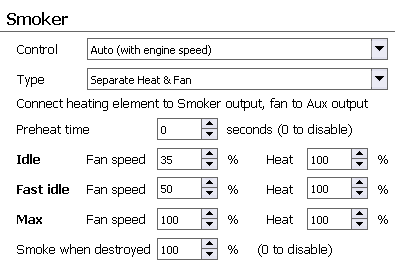
The SMOKER output on the TCB can be controlled in two ways. Auto (with engine speed) is what you should use if you actually intend to connect a smoke unit to the TCB. In this control mode the TCB will automatically take care of setting the speed with throttle, turning off the smoker when the engine is off, and applying the idle, fast idle, and max speed settings defined below. But if you are not going to use a smoke unit you can treat the SMOKER output as a general purpose, unidirectional motor speed controller. In Manual mode the output can be controlled with any analog trigger source assigned to the Smoker - Manual Speed function.
Type
Here you can select the type of smoker device you are using. If you have a standard Heng Long/Taigen type smoker where the fan and the heating element are driven as one, then select Combined Heat & Fan. If however you are using some kind of custom smoker where you intend to control the fan and heating element separately, select Separate Heat & Fan. When using separate outputs, you will need to connect the fan to the AUX output of the TCB (it must be a 5 volt fan), and connect the heating element to the SMOKER output (it will receive full battery voltage). Note: if you are using Separate Heat & Fan, the “Flicker Lights during Engine Start” option is disabled (because it would create a conflict with the use of the AUX output).
Preheat Time
This option becomes available if you are using separate heat and fan outputs, and will allow you to specify a length of time in seconds (maximum 240 seconds/4 minutes) that the heating element should be powered before the tank engine is started. Set this option to 0 to disable preheating or if you don't want an engine start delay. Otherwise if a time is specified, when you start the engine with whatever trigger you have assigned to that function, the heating element will immediately be turned on to full power (battery voltage) and an optional pre-heat sound will be played as a notification (User Sound 2 if using the Benedini TBS Mini or “preheat.wav” if using the Open Panzer sound card). After the length of time specified has passed, the engine will automatically start and the smoker fan will then turn on.
Speed Notes
Note - there is no requirement that the idle speed must be faster than the max speed. Some users prefer to have a lot of smoke at idle and less smoke underway. To accomplish this sort of effect simply set the idle/fast idle speeds higher than the maximum speed and the TCB will take care of the scaling.
Idle Speed:
This is the minimum smoker speed (individual fan and heating element levels are available if you are using separate outputs). The smoker will operate at this speed when the engine is running, the transmission is engaged, and the vehicle is stopped.
Fast Idle Speed:
You have the option of setting a slightly faster idle speed to take effect when the engine is running but the transmission is disengaged (individual fan and heating element levels are available if you are using separate outputs). This can serve as a visual indication of the transmission status, and it also mimics the reality that many vehicles do have a faster idle speed when not in gear.
Max Speed:
This is the speed of the smoker at full throttle (individual fan and heating element levels are available if you are using separate outputs). Note that you are permitted to specify a maximum speed level less than the idle speed if you prefer less smoke output at higher throttle levels.
Smoke when Destroyed
This setting applies when the tank has been “destroyed” during IR battle. A destroyed tank is immobilized (“dead”) for 15 seconds, during this time the smoker will run at the speed specified here (fan and heating element will both be given the same level). If you do not want any smoke when destroyed set this to zero.
Recoil Servo
 If you prefer to use a servo for recoil instead of the mechanical units, the TCB has you covered. The recoil servo should be plugged into RC Output 5 (also labelled Recoil) on the TCB. The settings here allow us to precisely control the speed of the recoil and the speed of the barrel's return to battery (“return to battery” means the barrel is fully extended).
Note: Because the recoil servo is not directly mapped to any transmitter channel, there is no way to adjust the recoil servo's end-points or reversing by using a setting on your transmitter. Never fear, you can customize the recoil servo easily using the TCB's recoil servo setup menu: see the Servo Recoil page for more info as well as a video demonstrating the various settings discussed below.
Trigger with Cannon
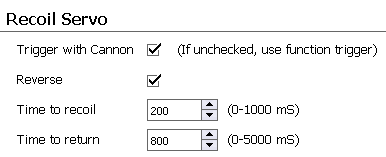
If checked, the servo recoil action will automatically occur when the Cannon Fire function is called. If unchecked, you may still manually initiate the servo recoil action by assigning a trigger to the Recoil Servo function.
Reverse
Check this option to reverse the recoil servo. You can also reverse the servo using the recoil servo setup menu directly from the TCB, see the Servo Recoil page for more information.
Time to Recoil:
Set the amount of time the servo takes to “recoil” (pull back) the barrel when the cannon is fired, in milliseconds (1,000 mS = 1 second). When the recoil action starts, the TCB will immediately tell the servo to go directly to the opposite extreme (recoil). But servos take time to rotate and there is no way for the TCB to know when the servo gets there. This setting tells the TCB how long to wait before it starts to move the servo back in the opposite direction.
If you set Time to Recoil to a number that is too low, the servo will not reach the opposite extreme before it starts to return. If you set it to a number too high, the servo will recoil the barrel and then pause until the rest of the time expires, and only then move back in the opposite direction (this can be useful if you want a pause).
This setting doesn't dictate how fast the servo should recoil - that is a hardware constraint of the servo which can't be changed. Instead, the purpose of this setting is to tell the TCB how long the servo takes to recoil.
Some trial and error will probably be necessary to determine the correct time for your servo and application. However all servos today are sold with published specifications regarding their speed which can be used as a starting point. Typically the speed is listed as the time it takes for the servo to rotate 60 degrees at 5 volts under no load. Of course in practice your servo may be moving up to 90 degrees or more, and it will be under a load. A good starting point is to multiply the 60 degree time by 1.5 and adjust from there.
Time to Return
This is how long the servo should take to return the barrel to “battery” (re-extend the barrel) after the recoil action. Typically we want this to be a slow movement, so the servo's max speed is not a limitation as it is with the previous setting. The TCB can't make a servo go any faster than it is physically capable of, but it can easily make it go slower. So although Time to Recoil is a setting that requires some trial and error, with Time to Return you can simply enter directly the value you want. For example if you want the barrel to take 2 seconds to return, simply enter 2000 as the value and that is precisely how long it will take.