Table of Contents
Infra-Red (IR)
There are two IR ports on the TCB - one for receiving IR signals, and the other for sending IR signals.
IR Receiver - aka, the "Apple"
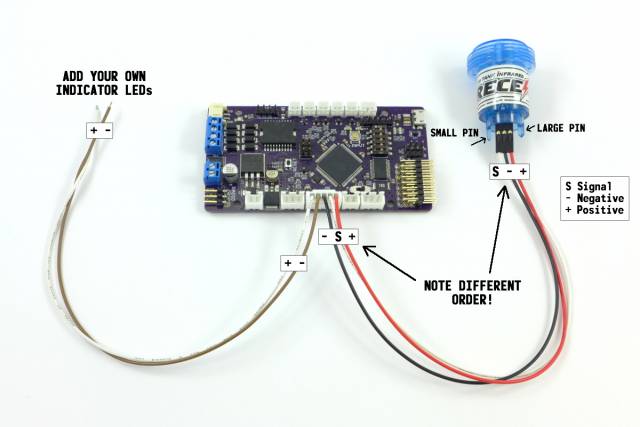
The TCB has a 5-pin port named APPLE with the same pin order as the Tamiya 5-pin apple. However, it does not use the same physical plug as the Tamiya since those are harder to source and more difficult for hobbyists to make their own cables with. The Tamiya uses Molex Micro-Latch connectors, but the TCB uses the much more common JST-XH connector. An adapter can be built that will allow the Tamiya apple to plug in directly, without modification. See the Accessories page for more information on Tamiya plug-and-play adapters.
The 5 pin connector has 3 pins for the IR receiver chip, and 2 pins for driving notification LEDs that will illuminate whenever a hit is received. There is no current limiting included on the LED pins, they provide a straight 5 volts. No current limiting is needed when using the Tamiya apple, but if you are making your own hit-notification LEDs (as you must with many other brands), keep in mind that you will probably need to incorporate a current limiting resistor into your wiring.
There are many different “apples” that can be bought, and this guide can't cover them all. After the Tamiya apple, the second most common is probably the Taigen/Heng-Long (same thing). These apples do not include hit-notification LEDs and so only require 3 pins for the receiver. Their pin order does not match the order on the TCB so be careful when you are creating your wiring harness. Examples of Tamiya and Taigen apples are shown below.
Apple LEDs Used for Confirmation
If you are using a Tamiya apple then display LEDs are built in, but other brands may omit them. If you do have display LEDs the TCB will use them to signal various things to the user, as shown in the video below.
IR Transmitter
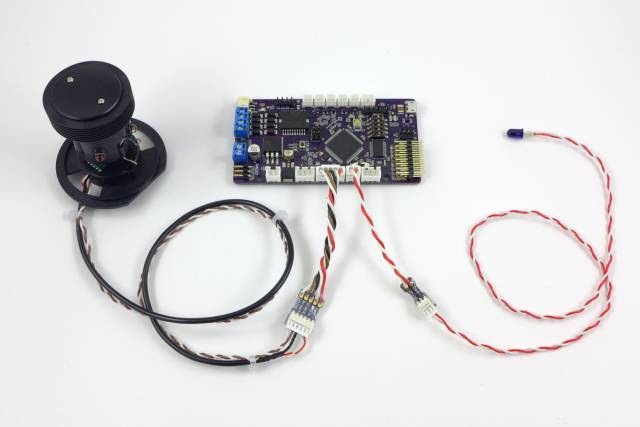
This port is labelled IR on the TCB board. It uses a 2-pin JST-XH connector to drive an infra-red LED. Once again the pinout is the same as used by the Tamiya MFU, but the plug is not. You will need to use an adapter as shown in the photo above. See the Accessories page for more information on Tamiya plug-and-play adapters.
The IR transmitter circuitry resembles the circuit on the Tamiya MFU. You may be surprised to discover that Tamiya drives its IR LED not with 5 volts but with full battery voltage. The TCB does the same. Keep this in mind if you are using a battery higher than the usual 7-8 volt packs typically used for RC tanks.
When the fight/repair switch is in the Fight position, full battery voltage is applied to the IR transmitter through a 3.3 ohm resistor. Although we don't know the exact specifications of the Tamiya IR LED (Item #7255030 from the #53447 1/16 Tank LED Battle System), we can be sure that 3.3 ohm allows much more current to flow than the LED is rated for. However, over-driving the transmitter LED is how Tamiya is able to produce such long distances, and because the signal duration is very short, we can get away with some overcurrent.
We conducted a test with the stock Tamiya LED connected to the TCB and powered by a Tamiya 6 cell Nicad. The Tamiya cannon protocol was fired once every 45 seconds, aimed at another TCB 40 feet away with a stock Tamiya apple. After several hours over 500 shots were fired and each one registered a hit. So although we are over-driving the LED, there should be little risk of burning it out. We tested lower values but found they would severely reduce the life of the LED. For example, with a 1 ohm current limiter the Tamiya LED would burn out usually before the 100th shot. Ironically, the Tamiya MFU appears to be using a 1 ohm current limiter.
If you flip the fight/repair switch to the Repair position, then an additional 1k (1,000) ohm resistor is added inline to significantly reduce the range of the IR transmission. You will need to get quite close to the tank you are repairing for the hit to register. This also prevents you from repairing enemy tanks on the other side of the battle-field. But remember, as soon as you fire that repair signal, whether the tank you are aiming at receives it or not, your tank will be immobilized for 15 seconds! So be sure you position yourself correctly before hitting the fire button.
Alternative IR LEDs
The Tamiya IR LED works very well, but is extremely expensive - over $10 US from most suppliers, if you can even find one in stock. The vast number of LEDs we burned up in testing motivated us to find a comparable replacement. We believe we found one with the Vishay TSAL6100. The DigiKey Part number is 751-1203-ND but it can easily be found at suppliers worldwide. Cost per LED is roughly 50 cents US even in small quantities.
Without the actual specifications of the Tamiya LED we can never be sure of an exact replacement. But the price difference of the alternative could make it attractive for clubs to buy them in bulk and distribute them for sanctioned battles.
A Note About IR and Slipring Turrets
Some tanks, notably Taigen brand, use an electrical slipring to pass signals to the turret but still allow the turret 360* rotation without tangling wires. Unfortunately, these sliprings are electrically noisy and if you run the IR reception wires through them, your tank will almost certainly confuse this noise for false hits. If you run the IR transmission wires through the slipring you may find that your hits are not transmitted correctly. In short, if you wish to use IR functionality in your model then you should not use sliprings.

