Table of Contents
Firmware
Update Firmware
On this tab you can update the software that runs on Open Panzer devices, which we call “firmware.” Think of the firmware as the operating system - it is the set of instructions that get executed when the device is turned on. The process of updating the operating system is often called “flashing new firmware” or “flashing a hex file.” The word flash refers to the process of overwriting an area of memory known as “flash” on the microcontroller where the code resides, and hex refers to the type of file that holds the compiled code we are flashing.
It is important to note that flashing new firmware is not the same thing as updating (writing) new settings to the TCB. We read and write the settings by using the green and blue arrow buttons. The settings are values you specified yourself on all the other tabs of the OP Config program. We can change the settings whenever we want, but updating or flashing the firmware only needs to happen when a new version of code is released for the TCB (or other devices).
Select Hex File for
From the drop-down menu select the device you want to update. Possible devices include various versions of the TCB, the Scout ESC, Open Panzer Sound Card, the Heclo shield for Mega2560 boards, as well as selections for generic ATmega or Teensy devices for which you have a hex file (useful for experimenters).
Get Latest Release
 Click here to check the OpenPanzer.org website for the latest firmware for the selected device. If a file is detected the version number will be displayed and the hex file will be downloaded to a temporary folder. It is highly unlikely you will download a version of the firmware that is older than the version you already have on your TCB, but it might be the same version, in which case flashing the update is unnecessary. You can always check which version of the firmware your TCB is presently running by connecting to the TCB and looking at the Serial Status label on the bottom left of the OP Config program (#8 on the Program Layout diagram). You can also read the firmware version by connecting the TCB to any serial console (such as the built-in console discussed below), and pressing the INPUT button on the TCB board, which causes the TCB to send diagnostic information including the firmware version to the console. Firmware versions may be displayed for other compatible devices as well (Scout ESC, Open Panzer Sound Card, etc…)
Use Your Own Hex
If you are a developer and have compiled your own hex, or perhaps were given a testing Hex by a developer on the Open Panzer forums, you can select it using this button. If you are working on a project in the Arduino IDE, you can generate a hex file by typing Ctrl+Alt+S or going to the Sketch menu and selecting the “Export compiled Binary” option. The hex file will then appear in your sketch folder (instructions valid for Arduino 1.6.5, and may change with future versions). Advanced Note: you can use OP Config as a general purpose firmware loader for any ATmega328, ATmega2560 or Teensy 3.2 boards using the “Generic xxx” options.
Flash
Once you have selected a hex file, either the latest release you downloaded or one of your own, click the Flash button to attempt flashing the hex to the device. The flashing process will be slightly different depending on the device you selected:
TCB
Be sure you have selected the correct COM port first, and be sure you have Dipswitch #5 on the TCB set to use the correct serial port (Dipswitch #5 in the On position to flash over USB, or in the Off position to flash over the Serial 1 port which is used for Bluetooth communication). The status of the flash operation will be shown in the console window. Be patient, the flash operation can take 30 seconds or more.
TCB - DIY Version
This is the TCB firmware for those trying to make a TCB using an off-the-shelf Arduino Mega board. All the functionality is the same except two outputs have been relocated to different pins in order to make it easier for those assembling such devices:
- Machine Gun LED - will now be on Arduino Pin 20 (also labeled SDA on the Mega board)
- Airsoft/Mechanical Recoil Switch - will now be on Arduino Pin 21 (also labeled SCL on the Mega board)
For building a DIY TCB please read this thread.
TCB - Heclo Shield
Kim Olsen (username Heclo) designed a shield that when combined with a standard Arduino Mega2560 board will provide all the functionality of the TCB, and then some. For more information on his design, please read this thread.
Scout ESC
Before flashing your Scout, be sure to disconnect it from your TCB otherwise the operation may fail. The Scout does not have a built-in USB connection, instead you must use an FTDI adapter or FTDI cable. One end of the adapter/cable will have a six-pin socket that plugs into the six pins on the Scout. Be sure to orient it so the “Black” and “Green” labels on the adapter match the same labels printed on the bottom of the Scout board. The other end of the FTDI adapter/cable is a standard USB connection that you use to connect to your computer. Be sure you have selected the correct COM port in OP Config, then click the Flash button. The status of the flash operation will be shown in the console window.
There are two versions of Scout firmware. Both have the same functionality but changes are required for different hardware revisions of the Scout board:
- Scout ESC (R11+): For Scout board revisions from 11 forward (using the VNH5019 motor driver chips)
- Scout ESC (R10 and prior): For Scout board revisions 10 and earlier (using the VNH2SP30 motor driver chips)
Open Panzer Sound Card
Connect your Sound Card to your computer using a standard USB cable. A new entry may or may not appear in the COM ports list but in this case it doesn't matter that you select a COM port, the software will detect your sound card automatically. After you start the Flash operation, you need to press the small button on the top of the Sound Card. This allows OP Config to detect the device and let it know to start flashing. You may hear the USB connect/disconnect sounds from your computer during this process, that is normal. The status of the flash operation will be shown in the console window. If you forget to press the button or OP Config can't find your device, the flash operation will time out after 10 seconds.
Generic ATmega328 / Generic ATmega2560 / Generic Teensy 3.2
You can use these selections to flash firmware from your own hex (there is no default hex to download from the internet) to any Arduino-compatible device with an ATmega328 or ATmega2560 processor (Uno, Duemilanove, Nano, Mini, Mega or their respective clones; your own design; etc), or to the PJRC Teensy 3.2. Most people will not need to use these but it can be useful for experimenters.
Console Utility
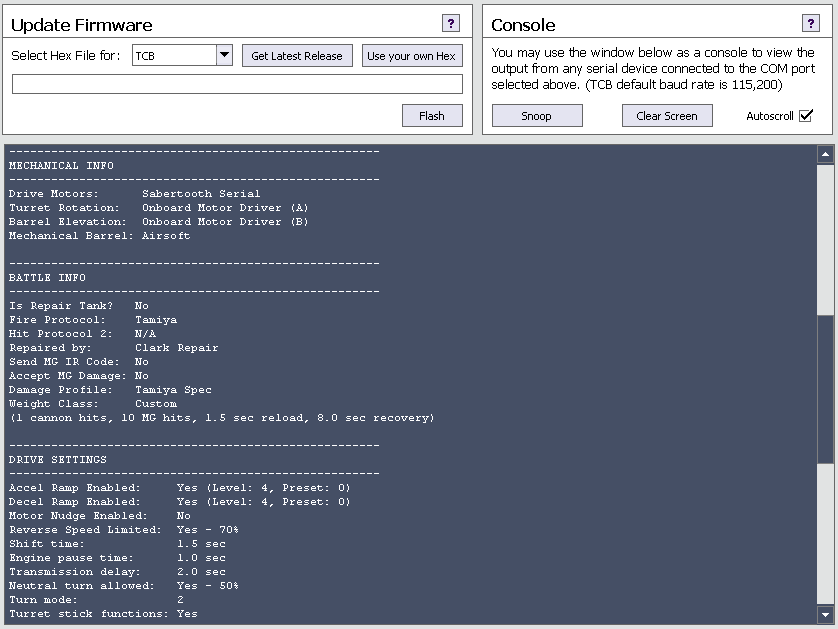
The built-in console is a very useful debugging tool. It is basically a window to whichever COM port you have selected, and if you are in “Snooping” mode, any information received on that COM port will be printed in the console window.
What is the difference between “Snooping” the TCB and “Connecting” to the TCB using the Connect button? Both are very similar - they both attempt to open the COM port and then process serial data on that port. The difference is that when you “Connect” to the TCB, after the COM port is opened the OP Config program sends a command to the TCB which puts the TCB into a special state where all it can do is communicate with the PC. In this communication state, all motors and outputs on the TCB are turned off, and the TCB will not respond to any commands from your radio transmitter. It waits for instructions from OP Config and does nothing else until disconnected.
Snooping opens the COM port but nothing more. No commands are sent to the TCB, it is free to operate normally. You can drive the tank in this mode if you want, though it may be hard to go far if you are plugged in with a USB cable (or you can use Bluetooth). More importantly, if you press the INPUT button on the TCB while snooping you can dump diagnostic information to the serial port which the console window will display. And if you have Debugging turned on, the TCB will also report information in real time as you operate it - function triggers will be reported, battle hits, tank movement, and more will all be sent to the serial port where you can read it on the console window. This can be very useful for verifying that the TCB is doing what you think it should. And because no special handshake is performed or required, you can also use Snoop mode to read serial information from devices other than the TCB.
Snoop
 When you click the Snoop button, the selected COM port will be opened at the specified baud rate. If you were already “Connected” to the TCB, the TCB will be told to resume normal operation mode. Click the button a second time to stop snooping.
Clear Screen
This will empty all prior contents from the console screen.

