Functions and Triggers
 The ability to link Functions and Triggers is a key feature that sets the TCB apart from any other product on the market today, and gives it so much power and flexibility. “Functions” and “Triggers” may sound complicated if you haven't heard about them before, but don't worry, the concept is very simple.
Functions
Functions perform a task. Functions allow you to do things. Functions allow you to control external devices, such as “Turn On Light 1.” Functions can also control an internal property of the TCB: for example, “Disengage Transmission.” Functions can also modify operating parameters, for example, “Set Turn Mode to Mode 2” or “Set Acceleration Level.” There are dozens of functions and more will be added in time.
For a full list of available functions see the Function List.
Note: not all functions are always available. For example the function RC Output 3 - Pass-through, which lets you directly control a servo on RC Output 3, is only available if that output is not being used for turret rotation. Another example might be the function External Output A - Turn On. That function will obviously only be available if the I/O port A has been set to “Output” but it will not be available if I/O port A was set to “Input.”
Triggers
Triggers cause a function to be executed. Triggers are how you make things happen. Triggers can be any Aux channel on your transmitter. The Turret Stick is another trigger with 9 positions (the four corners, the four ends, and centered). If one of the I/O ports has been set to “Input” it too will show up as a trigger.
There are two basic types of triggers: Analog and Digital. A simple way to understand the difference is that a digital trigger is like the on/off switch on your stereo, and an analog trigger is like the volume control. Digital triggers have a finite number of positions, but the number of positions can be more than just on and off. Digital triggers can be switches on your transmitter that might have 2 or 3 positions. The Turret Stick as already mentioned is considered a digital trigger with 9 positions. On the other hand, Analog triggers are variable inputs. The best example is a knob, dial, or lever on your transmitter. You can also set one of the A or B I/O ports to analog input and attach a potentiometer to create another analog trigger.
Digital triggers can be assigned to functions that do something - analog functions can be assigned to functions that modify something or some value.
For a full list of available triggers see the Trigger List.
Note: Because most triggers actually come from your transmitter, it is very important that you run through Radio Setup before you start creating links between functions and triggers. It is especially important that you have correctly defined the types of all your aux channels - are they digital? Analog? Are the switches 2 position or 3 position? All the information you provide on the Radio tab will be used to populate the Trigger List on this tab. If the Radio information is wrong, you may find that your functions don't work as expected, or at all.
Linking Functions & Triggers
Now that we understand what functions and triggers are, all we need to do is decide which functions we want to use, and how we want to trigger them.
Note: You can assign more than one function to a single trigger. If you want a switch to turn on a light and play a sound at the same time, you can easily do so. Assign the switch to the light function, then assign the same switch to the play sound function.
Note: You can also trigger a single function from multiple trigger sources. This is probably something that won't be needed very often, but if for example you wanted to be able to start the engine from two different switches on your transmitter depending on your mood that day, there is nothing stopping you from doing so.
Note: You can create up to a maximum of 40 function-trigger pairs.
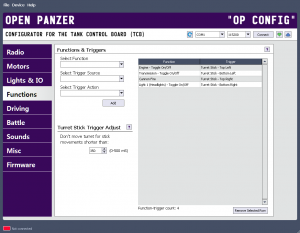
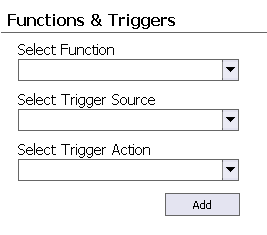
Select Function
 This is the full list of available functions. As mentioned before, not all function are available all of the time. Some functions only appear if settings elsewhere permit them to. Select the function you want to assign a trigger to.
Select Trigger Source
Once you have selected a function from the first list, now you can select a trigger source. Only trigger sources that will work with the selected function are shown. For example, if you selected the function “Engine - Turn On” you will only see digital triggers in this list, such as switches. On the other hand, if you selected the function “Set Deceleration Level” you will only see analog trigger sources. If you see no trigger sources at all, that means you do not have any of the correct type defined. Perhaps your radio doesn't have an analog auxillary channel, for example, so you might not be able to trigger any analog functions.
Select Trigger Action
Trigger actions are further information that define digital triggers. Let's say you selected Aux Channel 1 as your Trigger Source, and Aux Channel 1 is defined as a 3 position switch. Now in the Trigger Action list you will see three options: Pos 1, Pos 2, Pos 3. You need to choose which position of the switch you want the function to be triggered on.
Analog Trigger Sources will only have a single Trigger Action with the name of “Variable.”
Add Button
Click this button to create a link between the selected Function and Trigger. If it doesn't already exist, you will see it added to the table of function triggers on the right side of the screen.
Remove Selected Row Button
If you want to remove a defined function-trigger, highlight it in the table, then click this button.
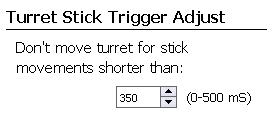
Turret Stick Trigger Adjustment
 This setting only applies if you have are using one of the 9 Turret Stick positions for any trigger, otherwise it is ignored. This setting introduces a delay in milliseconds (1,000 mS = 1 second) from the time you first move the turret stick on the transmitter, to when that movement is actually applied to the turret rotation motor or the barrel elevation motor.
Why would we want a delay? Let's say you assigned the Turret Stick position of “Top Left” to trigger the “Cannon - Fire” function. Assume there is no delay implemented. When you move the turret stick to the top left corner in order to fire the cannon, the TCB will detect the stick starting to move towards that corner. The radio signal is updated dozens of times a second. Even if you move your thumb quickly to the top left corner, to the TCB it will seem like it takes a long time. While the stick is on its way to that corner, the TCB will interpret the turret stick command as “I should move the turret to the left and elevate the barrel.” When your thumb finally gets the turret stick all the way to the top left corner, only then will the TCB interpret the command as “I should fire the cannon now.”
If all you really wanted to do was fire the cannon, you may be frustrated that the barrel and turret moved too - and it may throw off your aim! For that reason we can specify a delay. Any turret stick movement that takes less time than the delay will be ignored for purposes of actually moving the turret or barrel. If you set the delay to 500 mS (1/2 second), and it only takes your thumb 250 mS to get the stick to that top left corner, then you will be able to trigger the Fire Cannon function without having the turret actually move when you do so.
The drawback of course is that now when you do want to move the turret, you will experience a lag in control equal to the time you set here. If you set the delay to 500 mS, you will have to hold the turret stick over 1/2 second before the turret starts to move. This can also be frustrating.
There is no perfect solution to this issue. Trying to fix one problem makes the other problem worse. That is why you can specify for yourself what the delay should be. If you want perfect responsiveness of the stick for turret movement, set the delay very low, or disable it completely by setting it to 0. If it is more important that you be able to reach the corners in order to trigger functions you may have assigned to those corners without at the same time moving the turret or barrel, set the delay higher.
And of course if your transmitter has lots of switches you can simply assign all your triggers to auxiliary channels. If you don't have any triggers assigned to the Turret Stick, this delay is disabled completely and you will find the turret stick very responsive.