This section allows you to view all posts made by this member. Note that you can only see posts made in areas you currently have access to.
Messages - NS-21
16
« on: February 09, 2022, 04:49:19 PM »
When I assembled my first version of TCB, and showed it to our respected author - he then said:
- Very excellent! I understand that you were able to deal with the bootloader?
- Oh teacher! What bootloader are you talking about?
- Well, how about what? About the same.
And gave me information. And he said - since you removed the chips from the finished boards - that's why everything worked for you!
But if you had a chip from the store, you would have to flash the bootloader yourself.
This is where I fell asleep.
And here I am faced with the problem of lack of knowledge.
Chips 2560 - impossible to buy.
In my scientific research - I use removed chips - from Arduino boards. Yes, I now know they contain a bootloader.
And therefore, when I soldered my mini-TCB projects - everything was flashed for me using Tx + Rx + GND through CP210x
It was the best day of my life. My project, based on the project of the respected LukeZ - works!
I jumped around the apartment - joyful, shaking a nuclear warhead! (Russian version of joy).
Bear - furiously played the balalaika.
I don't have no chips from the store, and here's the question. How to turn a chip removed from the board into an already flashed Arduino bootloader - as if it had just come out of the factory. How to clear the bootloader?
So that I can test my knowledge and check if everything is correct - did I do it on my board?
17
« on: February 09, 2022, 12:53:04 PM »
Live a century - learn a century (s). Russian proverb. Thanks.
That's the level of voltage drop - I did not pay attention.
In general, this is very upsetting.
I just started to understand electronics, gained some basic knowledge - but you can’t assemble anything because of the lack of elements.
Dear LukeZ.
You reminded me about the bootloader, and the need to flash the chip from the store. I redesigned my boards and added pogo-pin pads to flash the bootloader.
Can you tell me how to turn the Arduino chip - as if it were from the factory, so that I can try out how to flash the bootloader.
I also had problems in the OP Config version, which I translated into Russian.
There are problems in the section - reading the radio. The program stops showing the movement of sticks and switches.
Tell me where I should write to ask you a question.
18
« on: February 08, 2022, 02:28:03 PM »
I was in great shock when I learned that ordinary components (microchips, not graphics chips for video accelerators) turn out to be - there is a huge shortage all over the world.
I'm sorry that I can't assemble my small version of the Open Panzer Sound Card due to the complete lack of key chips.
Mouser.com promises tiny availability (700 chips) only by August of this year.
For my TCB crafts, I use Robotdyn MEGA2560 Pro Embed boards bought on Ali as chip donors.
I already got working test versions of my TCB version - just soldering the chips from this board, without even programming the bootloader. Everything worked great.
In order not to create a new topic with questions regarding the radio elements of the TCB project, I will ask the respected LukeZ what he thinks about replacing the MIC29300-5.0WU with the LM1085S-5.0
I am very confused by the manufacturer LM1085S-5.0 (Manufacturer - HGSEMI)
The microcircuit that LukeZ uses in its original project is a well-known manufacturer, but the price of the microcircuit is high.
The only replacement that I picked up - the manufacturer is unknown to me, and the price is small.
I read the data sheet - it seems identical.
Thanks in advance for the responses and opinions of all members of the community.
19
« on: October 22, 2021, 07:01:23 AM »
Yes, I also did not say that the model is bad. I myself did not understand why I became unpleasant to him and he chose this style of communication with me.
20
« on: July 04, 2021, 07:16:19 AM »
Perhaps you misunderstood me. Or I misunderstood you.
I meant that I am not any hero, an ordinary person.
21
« on: July 03, 2021, 07:11:11 PM »
it seems you be a hero...  What a hero I am. Uncle. I registered on the RCTW forum a year earlier than you. And I read it even earlier, without registration. You are in 2017, I am in 2016. By the way, today I first wrote on RCTW - the first comment, from 2016. I am not saying this for the sake of exaltation, but simply as a user. I have always counted, and I count. The forum is a place for exchanging experiences. I now - I think that I am not strong enough to translate the work of the author LukeZ - into Russian. I just do it. I am for as many people as possible to use his labor. If I were in his place, and my works were translated into Chinese. ... ... Damn! My work in another hobby was translated into Chinese. ... ... The truth about the war. But it's also nice that my work hasn't been lost, and someone has repeated my path in cosplay. https://www.instagram.com/p/CBMx9yNBUn8/
22
« on: July 02, 2021, 05:46:24 PM »
This is how I convert the unit of the fixed barrel of the HL tank (M26, without recoil of the gun) - into a gun with recoil, and the correct setting of the tilt-lift axis of the gun: Spoiled the airsoft gun module to correctly measure the position of the cannon axis.  Made a rough 3D model. After that I will add servo mounts, a gear for lifting the barrel, for now this is only a beta version, for trying on.  How it looks now inside: 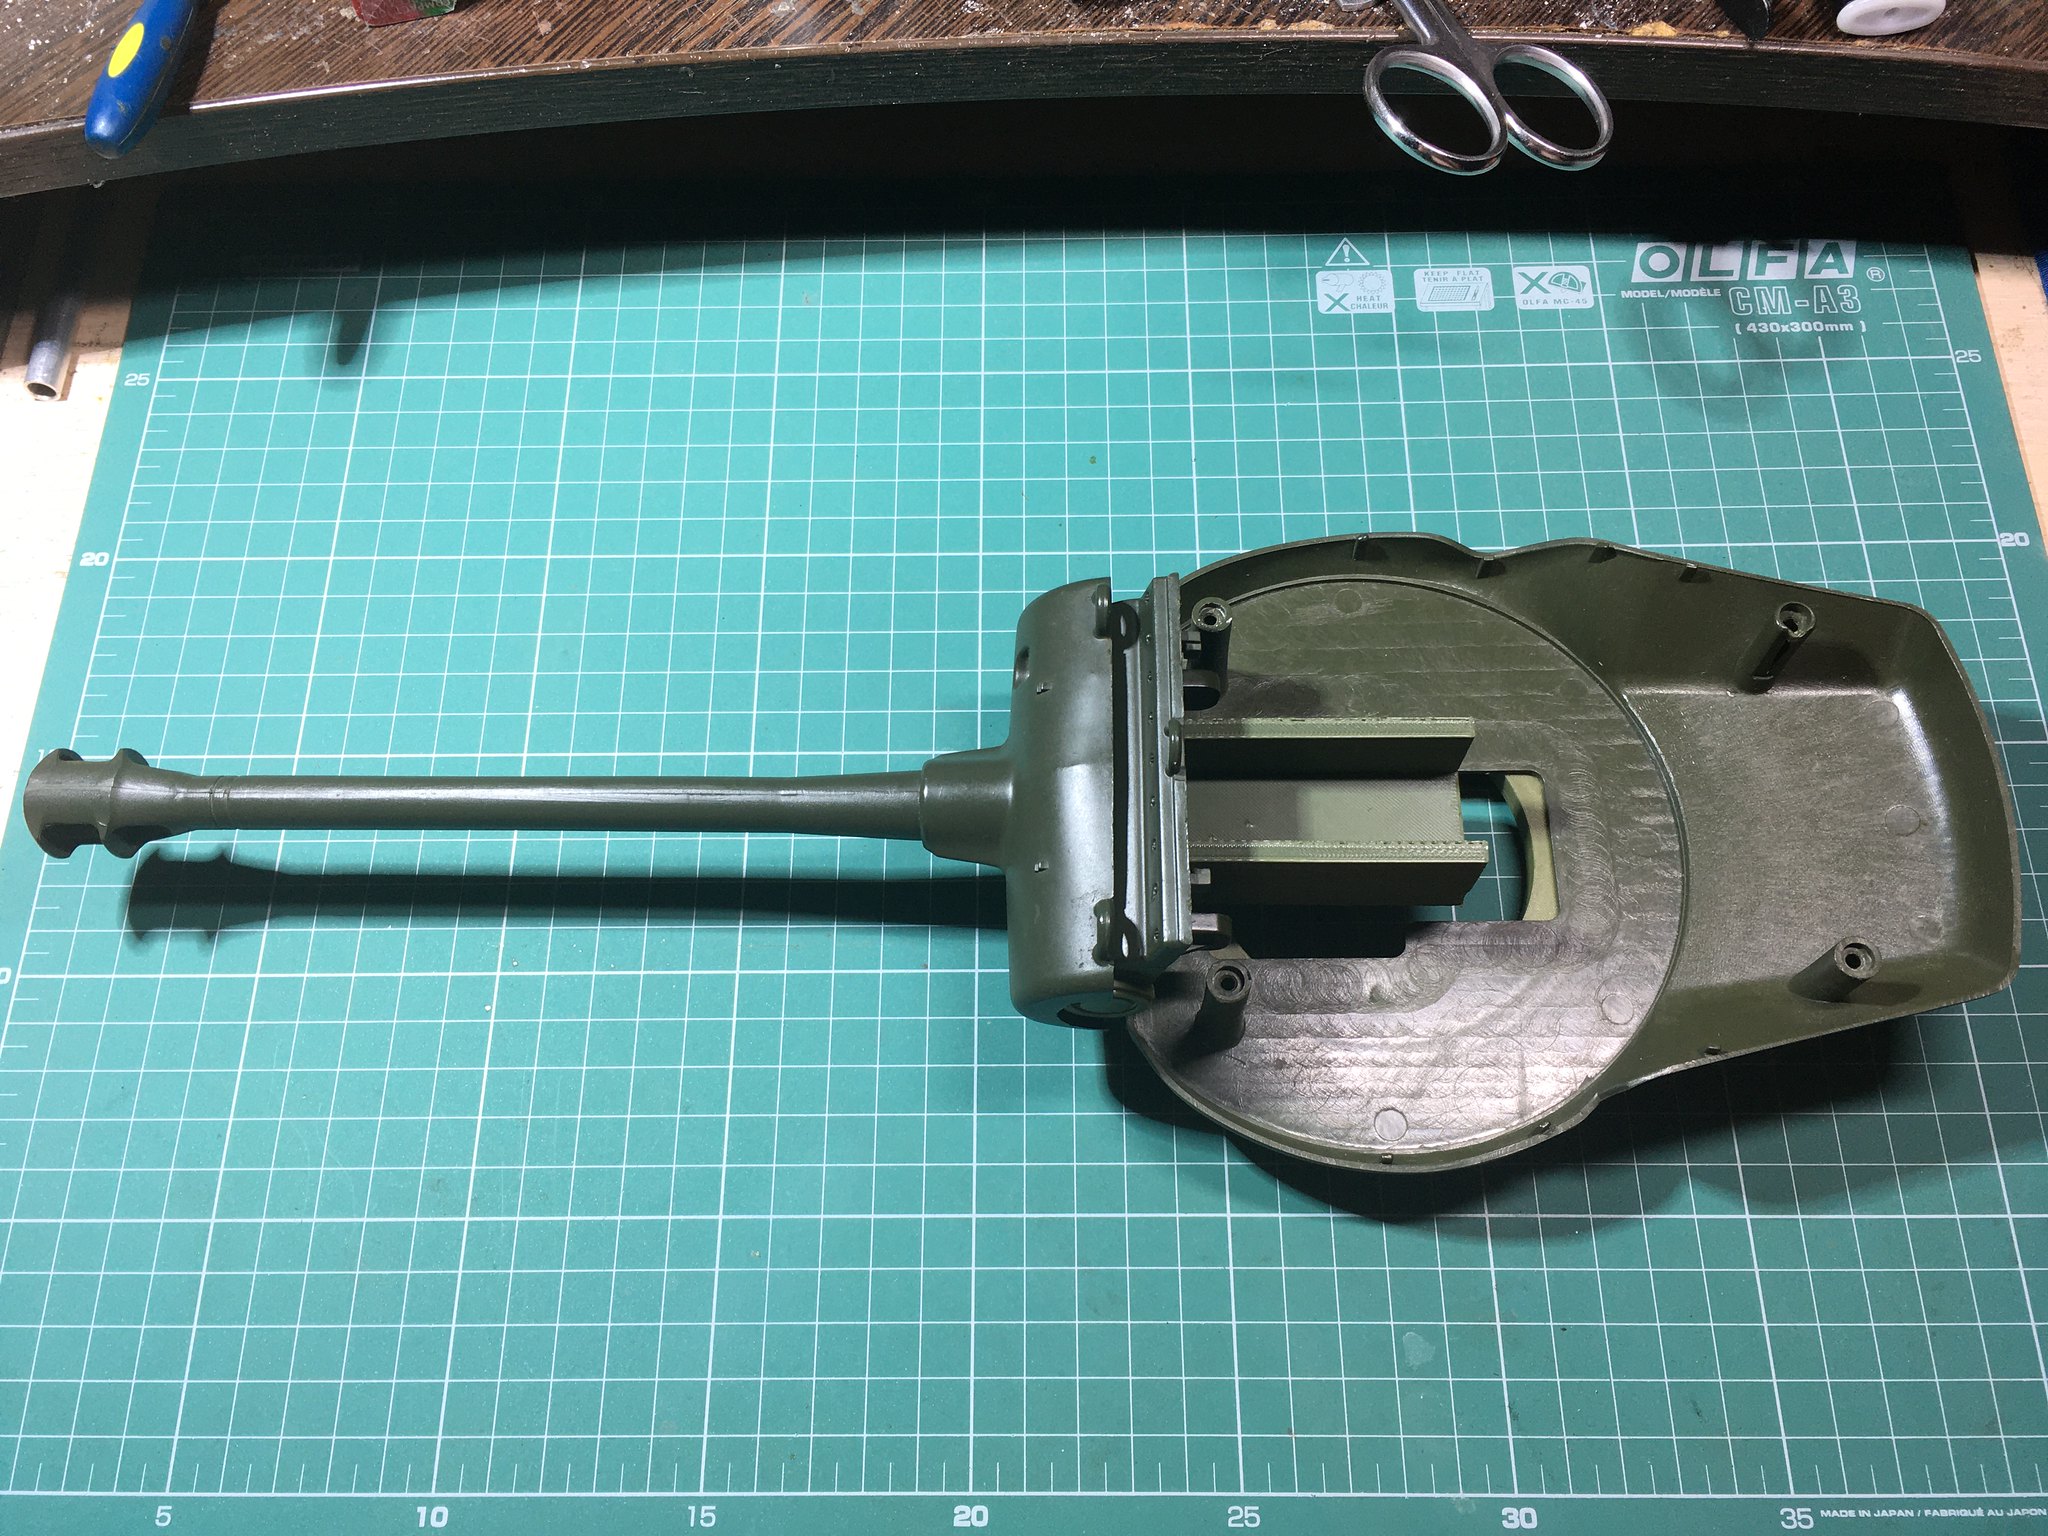   Work continues. Thank you for your interest.
23
« on: July 02, 2021, 07:24:52 AM »
Hi jhamm!
I am also registered with RCTW, and immediately recognized him on etsy, by his profile avatar.
I am familiar with his work on RCTW.
24
« on: July 02, 2021, 12:24:27 AM »
I don't have very much time right now but I will write you a better response this weekend.
LukeZ! You drive me into paint and I am terribly ashamed!
I am patiently waiting, I have known for a long time that you have a lot of work, it can be seen with the naked eye.
(if a person appears on the forum and spends enough time just to read - I know from my own experience that he is heavily loaded with work).
I also know that we have different time zones.
I still have something to do, waiting for an answer. I also translate the wiki.
25
« on: July 01, 2021, 03:58:27 PM »
This is a very talented author!
If I was interested in tanks of the Second World War, I would definitely buy.
I know this author from another of his projects - everything is on top there.
It's a pity that he is afraid to release his product for sale, fearing legal prosecution from the manufacturer of this tank in my country.
Even in our country where this newest tank is produced - many people are waiting for it to start selling the model, if you read their posts on Russian forums and not only.
(We are talking about T-14)
26
« on: July 01, 2021, 02:37:42 PM »
LukeZ, thx, I figured out how to translate help files, the process is ongoing, everything is clear, except for: How do I translate the area I have highlighted in red? Thanks in advance for the hint. 
27
« on: June 30, 2021, 06:25:56 PM »
If anyone is interested, here's where I left off last time and got back to work: 1. To begin with, I got rid of the battery compartment, making sure it is a little tight, but the work is not finished yet, as you can see:  Still need to close up some holes, put the oil seals on the gearbox. 2. The reverse side, without processing yet:  3. I made (printed on a 3D printer) a bearing shoulder strap for turning the tower (0.2 mm balls are still coming from China), and gear transmission of the rotation has not yet been printed on a 3D printer 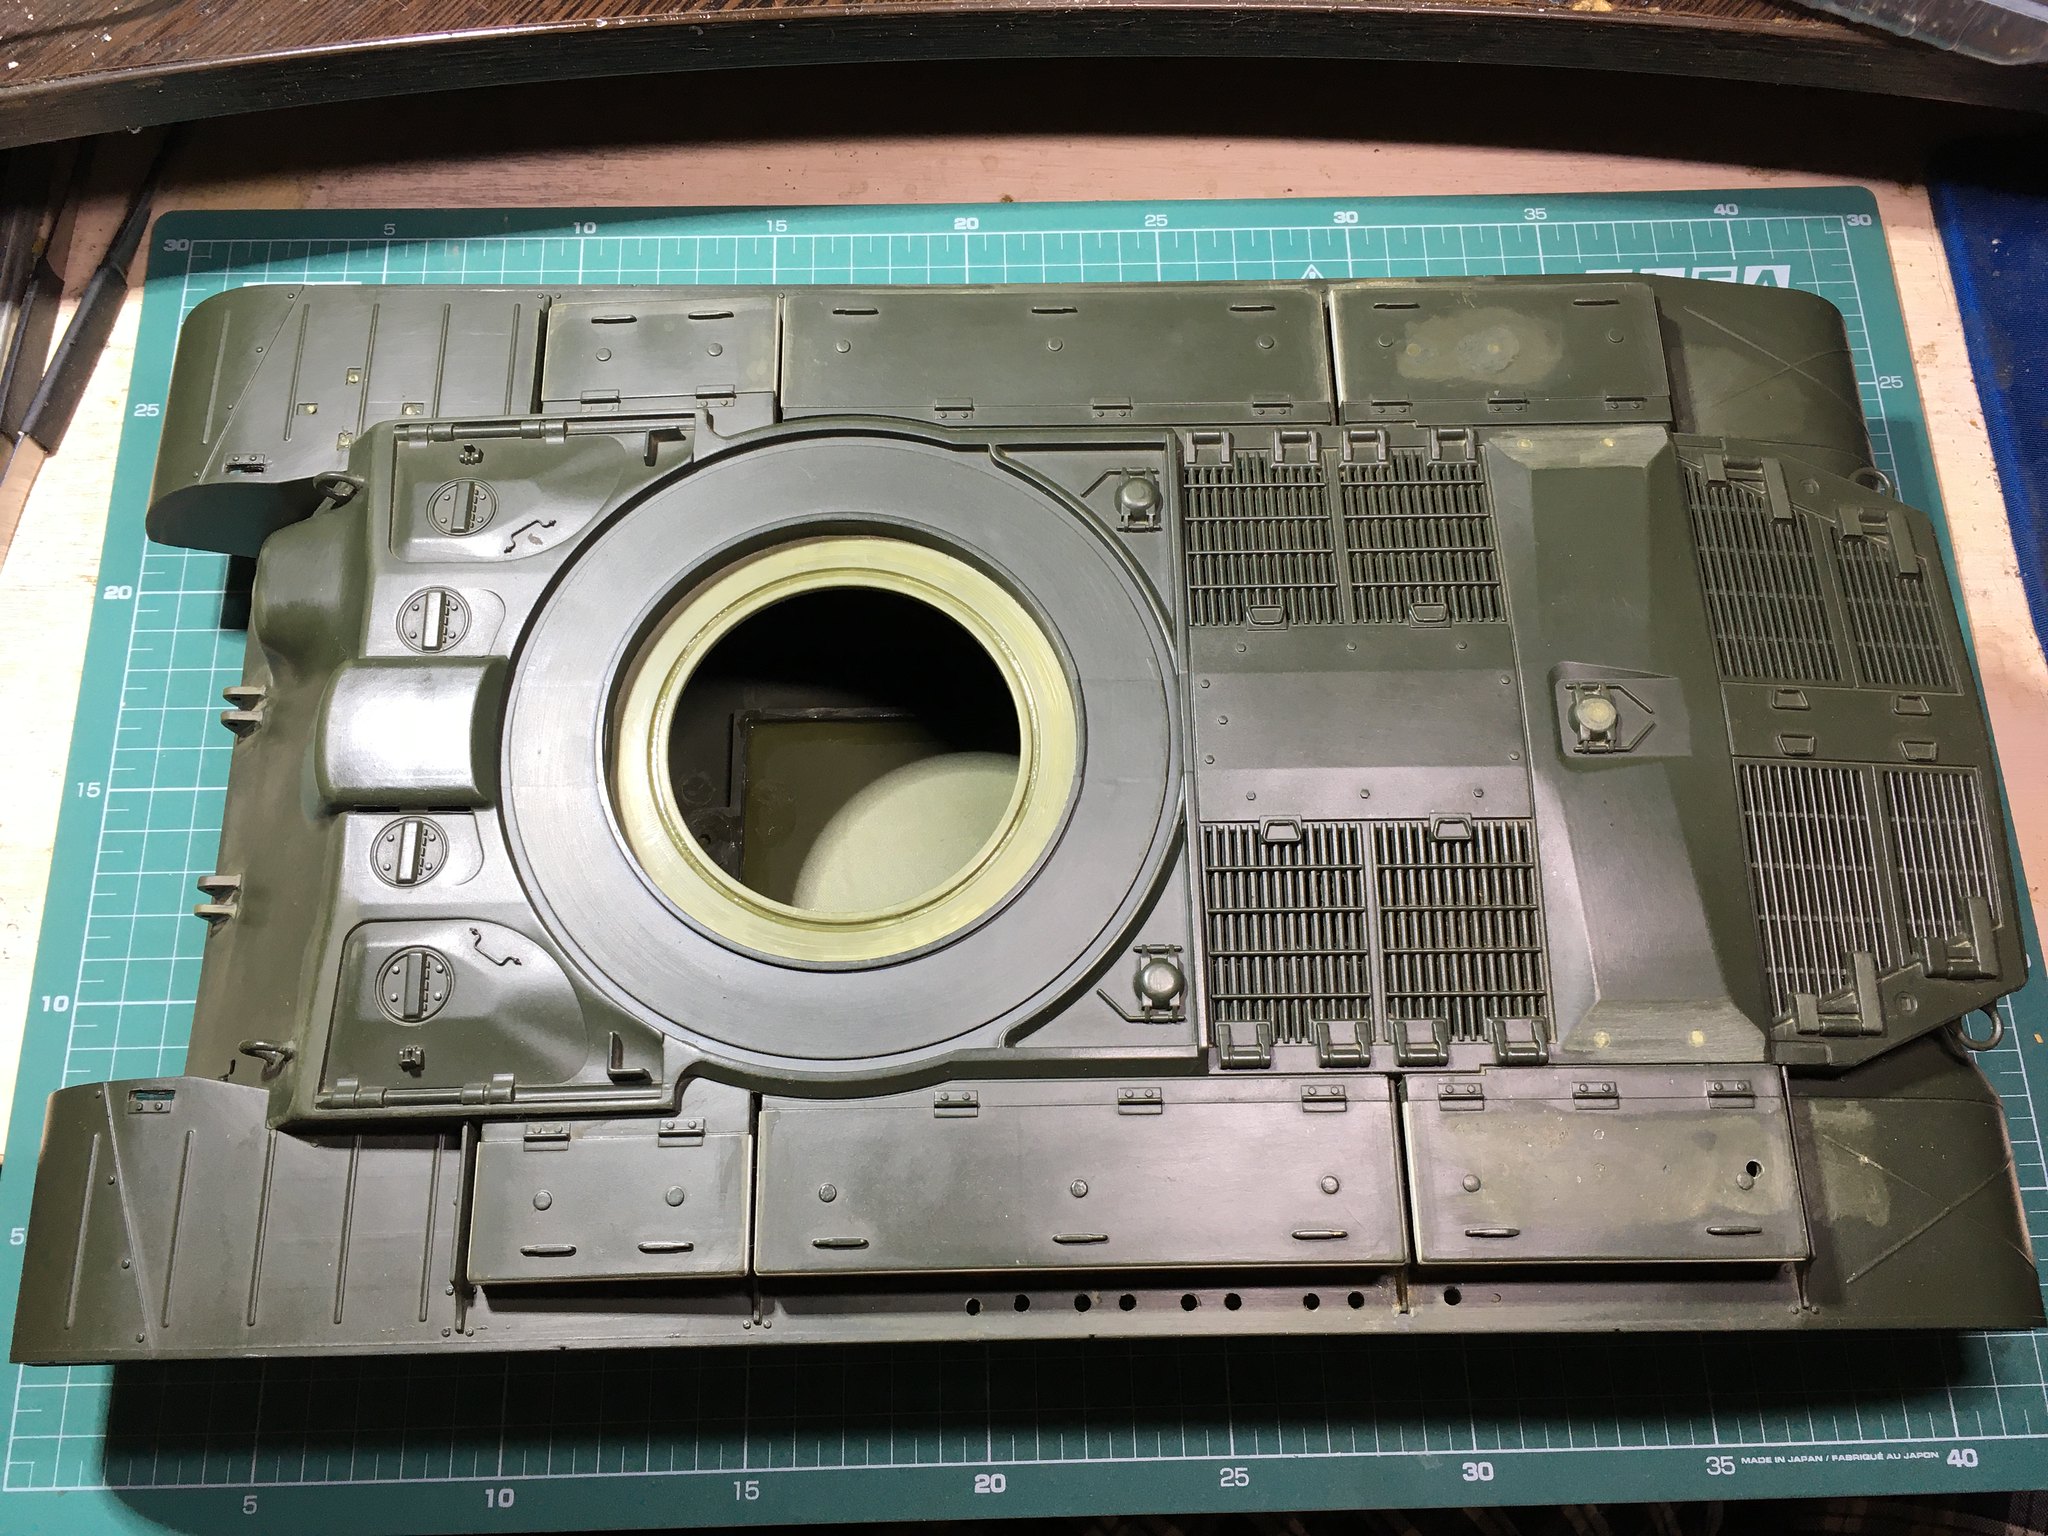   I also made a bearing for the rotating commander's cupola (The gear transmission of the rotation has not yet been printed on a 3D printer) = (:  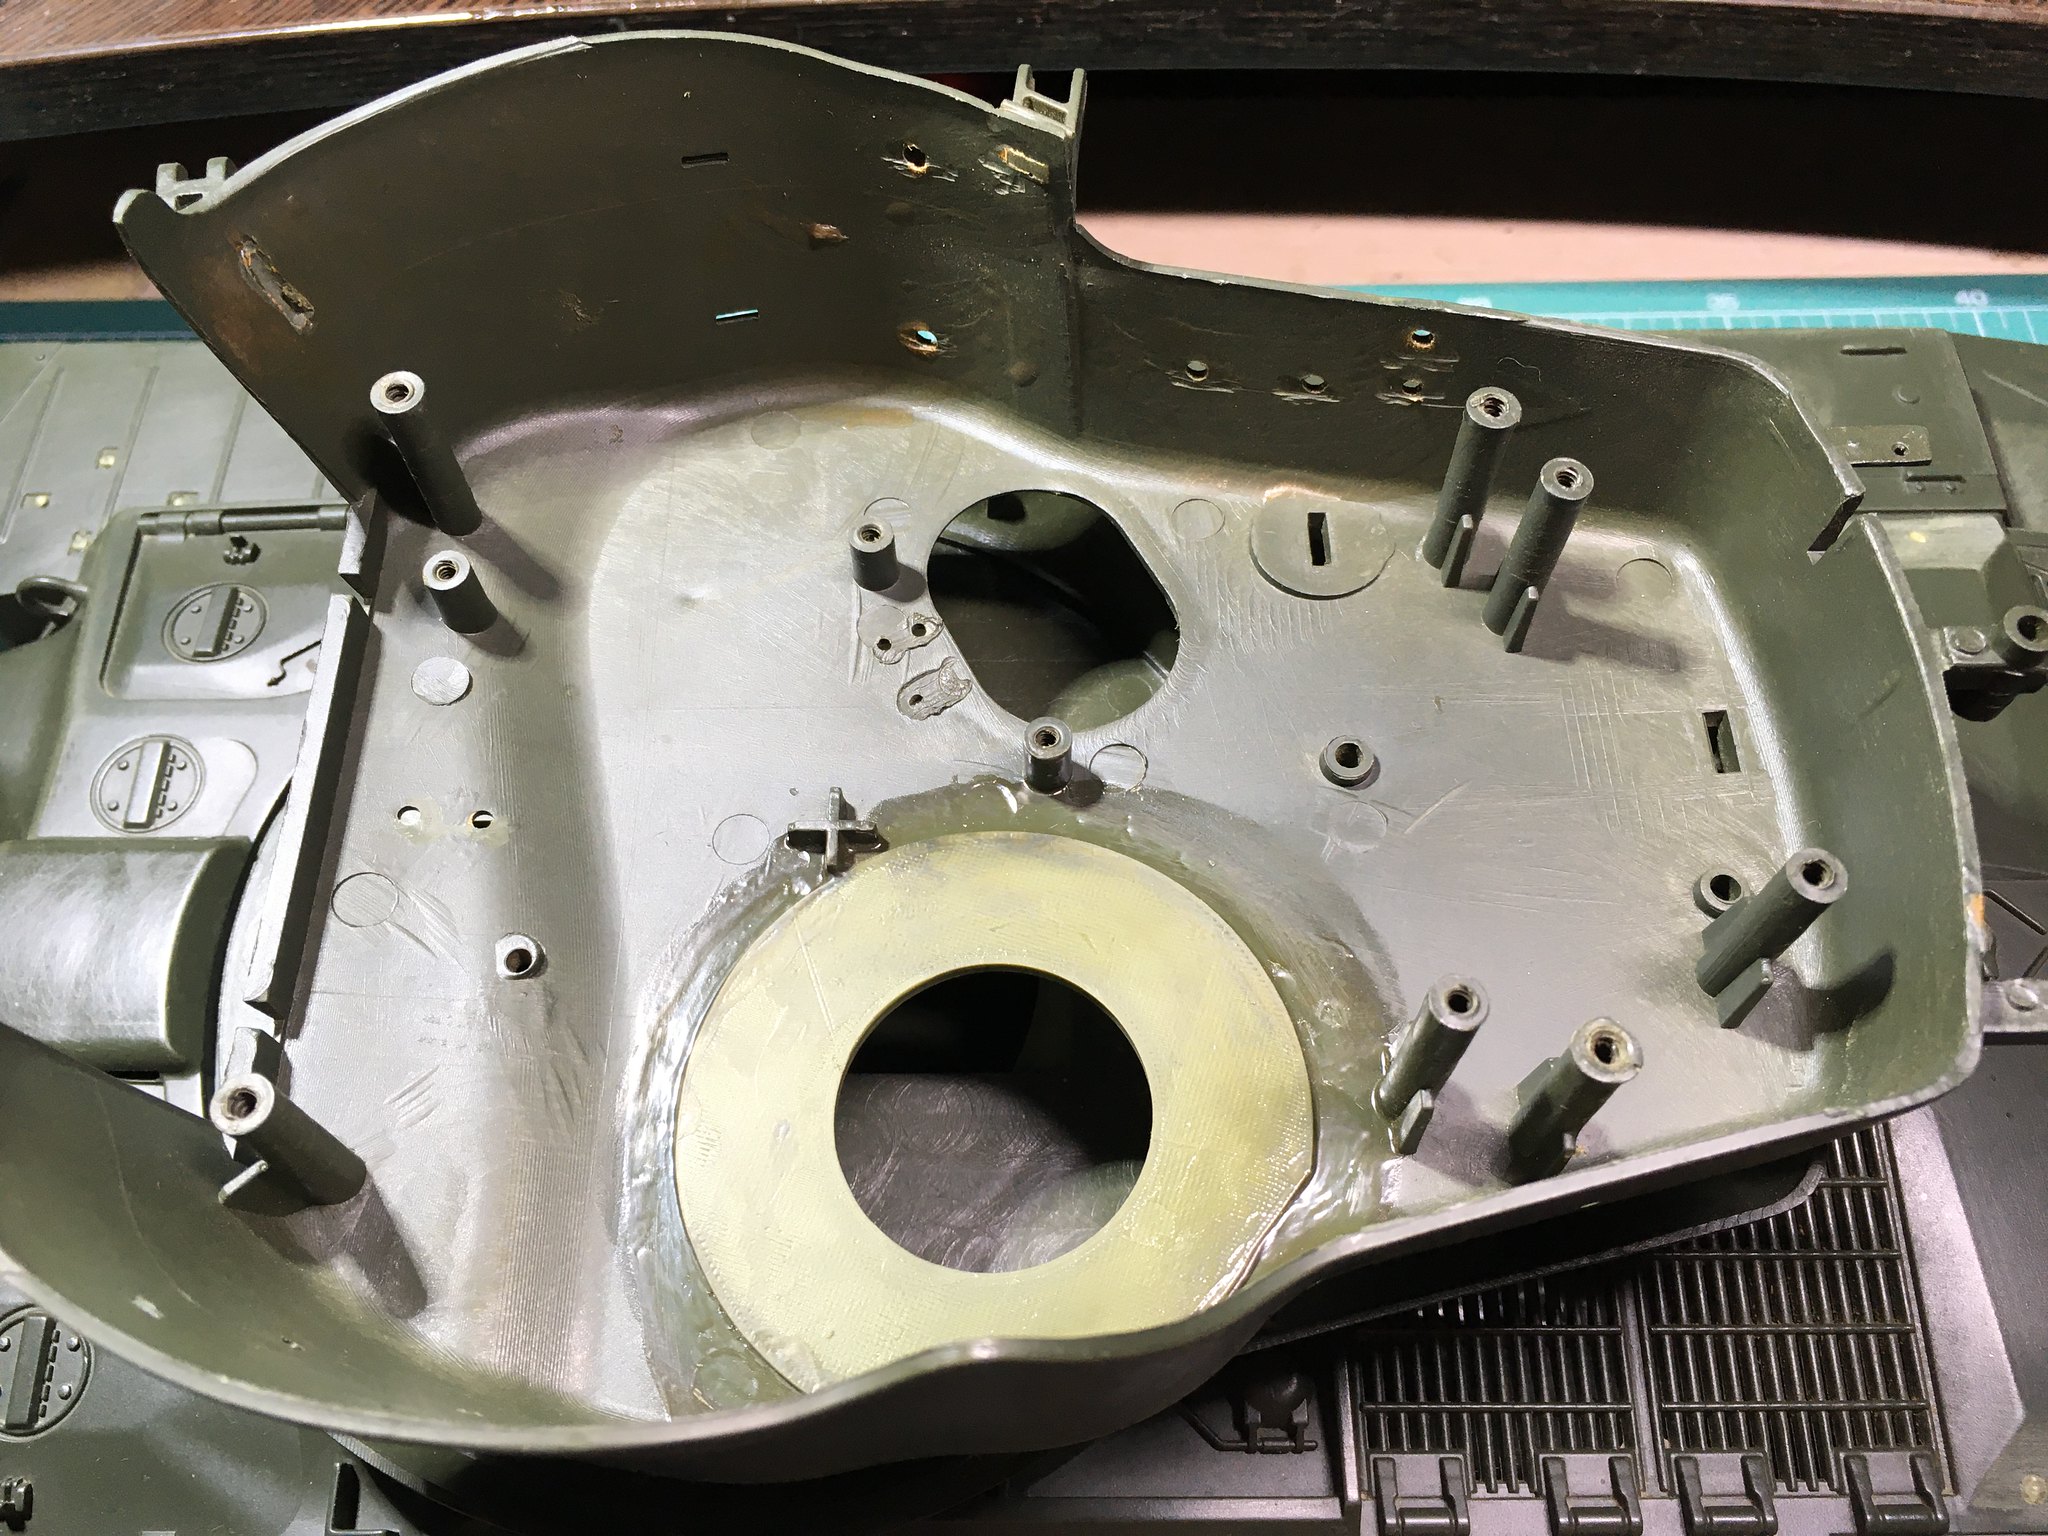   4. I repaired the holes left over from the attachment (not yet sealed all holes):  5. I have studied a lot of photos of a real tank, and I did not like the angle and location of the tank gun, as Heng Long did. I modified it a bit to make it look more like the original:   With regards to changing the point of installation of the gun, I was guided by this photo, which I took in our museum:  Yes, I know it's M46, but they don't differ much in the gun mask, yes, they have different guns. P.S. I don't remember if inserting images from third-party sources is encouraged, I set up a Flickr account just in case. If I am doing something wrong, let me know, I will not do it again. That's all for now, thanks for your interest.
28
« on: June 30, 2021, 04:34:07 PM »
I've been following your work and hats off to you two. I would be happy to purchase three. If not that then I would like use your designs to have three made for myself. I just ordered some Heng Long tanks. My son and I really like the Tamiya combat system but not the price tag. I want something that can be configured to emulate it.
Dear Savall21! At the time this topic was created, I got early experience in building a DIY TCB control board. I still have materials for making at least three control boards, without an arduino, then I tested them completely, except for the IR combat function (it did not have an apple), and with only one Sbus transmitter. I have not tested Ibus for work, since I do not have such equipment. I did not do the rest of the testing, since I switched to learning programming languages and project localization. I can solder this version of mine from the remnants, and give you the first first performance, and then my knowledge in electronics was meager. But I would not even want to give - what I am not sure about. Then - I was just learning programming and design, and I continue to learn now. P.S. Unfortunately, I found messages in this thread, and I can't remember if I received notifications. It was a difficult time then, I fell ill with this "fashionable" virus in a severe form, my left hand stopped working, in general everything was bad. But I'm here again.
29
« on: June 30, 2021, 08:25:38 AM »
LukeZ, thanks for the clarification on changing the help files. There is already a little understanding of how this is done.
I will try.
I have already translated the program by 90% (I also need to translate the pictures), now I am looking for all msgBox for their translation, and I cannot understand where they are
such variables \ labels:
1. Not connected
2. Connected to COM3 (115200) TCB Firmware 0.93.74
3. When there is a call to the function of resetting the entered settings in the program to default values - I can not understand where the data for translating the Yes \ No buttons is located
4. I also probably found a bug in Qt. More details:
I installed hot keys on the program menu functions, as it is very convenient when configuring the board - load with two buttons - read the settings from the board, save to the OPZ file.
On the menu function "Import settings" I have set the group of buttons Ctrl + I. In the mainwindow.ui file open in the development environment, I see with my own eyes that the group of buttons is set to Ctrl + I.
But when I build the project and run it from the relase folder, I get the result as in the picture. The hotkeys for this item are set to Ctrl + O.
In principle, I can ignore it, but my inner perfectionist gnaws at my heels.
P.S. I also feel I have to tinker with InnoSetup, I installed it on my computer, but I haven’t tried to play with it yet, making a trial assembly of the installer.
However, I think there should not be any big difficulties, most likely there you need to specify what and where to install.
Also need to study Github, and here is this point with tracking changes. I suspected there were features like comparing versions and showing changes.
I guess that Github is most likely arranged like a Wiki, most likely it is impossible to break-harm, but I don't want to disgrace myself ^ _ ^
The most important thing that pleases me is that I look into the structure of the source code - and I understand what and how it works. Everything is very logical and understandable.
For me, this is a great joy and achievement, because some time ago, I looked at the code like a ram at a new gate (Russian proverb).
As for It will be a pain in the butt and an eternity of unpaid work, so be careful if you want to go down this path!
It pleases me. It is very exciting and interesting.
30
« on: June 27, 2021, 03:47:45 PM »
There are several people tinkering with DIY-versions of the TCB but you're right posting activity has declined. However web stats still show healthy traffic to the site, I think a lot of people find the information they need without having to post anything.
Panic aside! I am always here and I work!
|