This section allows you to view all posts made by this member. Note that you can only see posts made in areas you currently have access to.
Messages - vonTirpitz
16
« on: January 29, 2017, 10:57:12 AM »
Forum is very quiet !
Hello Rebus, The forum might be quiet at the moment but I am certainly reading through the documentation as well and quietly gathering up the hardware I think I want to play with once the TCB becomes commercially available. I suspect things will flare back to life once more people actually have the TCB in hand and can play with it.  Welcome to the forums nonetheless! - Marc
17
« on: January 19, 2017, 09:48:07 PM »
The challenging part will be realistic engine speed routines. That is the part I expect the more people involved, the better the outcome.
I will try to remember to spend some time looking through code examples of dynamic sound manipulation. I like the idea of dynamically manipulating baseline audio to produce desired output. It greatly expands the uses of recordings and I would not expect the additional program logic to overwhelm the hardware so it might be a good path to pursue. An example can be found here (In the Flight Sounds section).
18
« on: January 19, 2017, 08:34:18 PM »
Mostly out of stubbornness, I completely uninstalled my previous Qt IDE attempts and performed a clean installation of the Qt IDE. Therefore, I would like to quickly revisit my successful Qt installation for compiling and running the OP Config utility. I will simply state that I really, really made the process more difficult than it needed to be the first time by attempting to integrate Qt into my Visual Studio 2015 IDE.  By rolling back to QT 5.4 (In this case 5.4.2) and using the MinGW compiler and tools for that version, everything progressed quite quickly. Perhaps someday in the future I will attempt to bring the project build up to the latest Qt version and integrate the Visual Studio IDE. Anyway, in order to compile and run OP Config (for windows 10 in this case) I performed the following steps: - Download qt-opensource-windows-x86-mingw491_opengl-5.4.2.exe from here (mac and linux operating systems are also available)
- Install qt-opensource-windows-x86-mingw491_opengl-5.4.2.exe
- After installation, run QT Creator 3.4.1
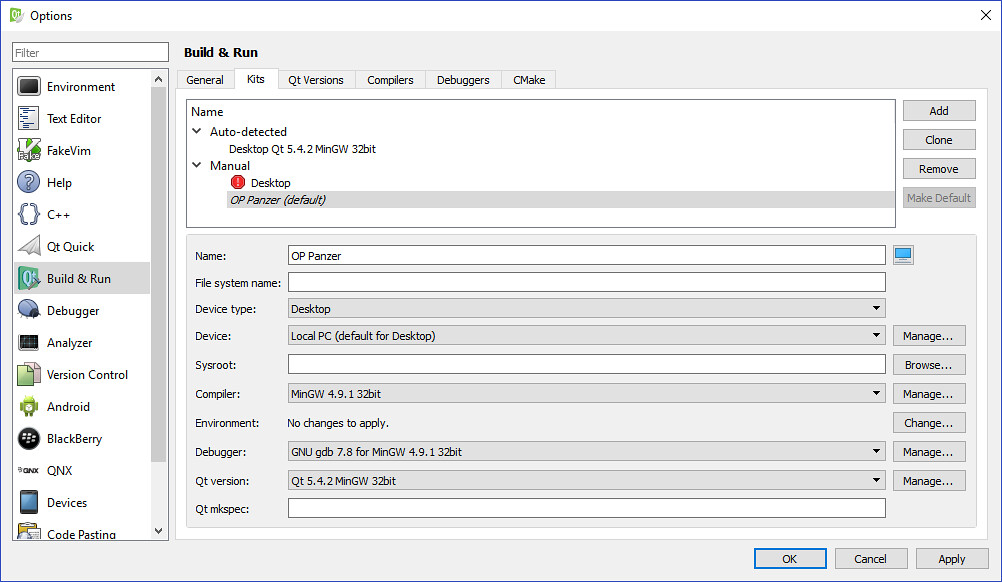
- By selecting Tools/Options we can set up a default configuration (build kit) for OP Config
- On the tab labeled "Kits" select the Add Button then type in a Name for the kit. I used OP Panzer for this label. Select 'Apply'.
The remainder of the kit fields should have configured on its own during setup and look something like this:
 - Next, extract OpenPanzerProject-OP-Config-7c32c22.zip (or latest release) to your own project folder.
- On the main window in Qt Creator we can now select "Open Project" in order to open OpenPanzerConfig.pro from the project folder.
Important! A popup window will appear stating that No .user settings were found and asking to import the previous settings. Simply select No then select the newly created build kit and continue opening the project.
At this point you should be able to build the project. On the left side of the IDE screen select the computer icon that is just above the green "run" arrow icon. From there, select "release" as your build type (the IDE will default to debug otherwise). You can now select the "hammer" icon at the bottom left to build the project. Once the build has successfully completed, you will want to copy all of the sub-folders and .dll files from the officially released version of OP Config into the folder where your newly built OPConfig.exe is located. 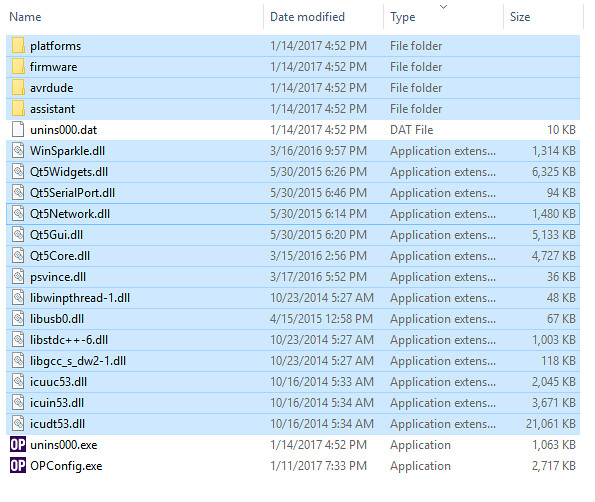 I suspect there are better configuration methods in the IDE to properly create and add these libraries during the build process (without having to manually move them). However, I am quite satisfied at the moment that anyone can now modify and test changes to the OP Config program. Once the build is complete and files copied you should be good to go! Just select OPConfig.exe and run it. While I haven't yet messed with the debugger I have been able to build and test all of the functionality in the program short of actually having a TCB to talk to. By the way, if you receive any compiler errors right off the bat I suggest clearing the system environment (from the project tab on the left side of the creator screen) and running qmake from build menu. This step really shouldn't be necessary for most of you unless you installed/uninstalled multiple versions of Qt as I had done prior to getting it right. Hope this helps and good luck! -Marc
19
« on: January 17, 2017, 10:27:41 AM »
I've stayed with Qt 5.4 for now.
I believe you are right so I have decided to roll back to the versions you are using. I had hoped to stay current with the latest Qt versions just out of my habit of thinking that newer might be better. 
20
« on: January 16, 2017, 07:10:34 PM »
Today it developed a strange mechanical "squelch" when turning left.
So I go out to video and record this new "behavior" so I can solicit help and my diva M4A3 decides to make no unusual noises and it performs flawlessly. I may have to customize it and name it the " Problem Child" (custom decals! whoot!). Go figure.  In other news... I finally managed to get Qt configured properly enough to build and run a release version of OP Config! Hurrah!  <- Edit: Still true but it actually happened a few days after this post. A couple of quick reminders for those who follow in my footsteps.Don't forget to run vcvarsall.bat from your Qt console. <- Only useful when configuring for use with Visual Studio.The help files and assistant folder didn't build into the project so it is likely there are several issues in my Qt configuration that I still need to resolve. <- FixedI also had to grab WinSparkle.dll from the original OP Config installation folder and put in with the newly built executable for it to run properly.1
1Not sure how I missed that particular .dll in the build but I am way too tired to look into it tonight. Ditto for the help files and anything else that didn't quite make it into the build. The only other thing I noted was that the menu items on the left of the UI weren't highlighting properly so I guess I am not quite ready for prime time.  lol. Nevertheless, I can now build, deploy and execute both the TCB firmware and the PC configuration software (to a somewhat lesser degree). I'll consider that a personal victory at this point and can now turn my attention mostly to the code itself. Aside from fixing some of the Qt config issues I will likely focus on the firmware from this point forward.Edit: A couple posts further down I have provided step by step instructions to quickly and easily install and configure the Qt IDE for use with this project so most of this post isn't applicable.
21
« on: January 15, 2017, 07:32:58 PM »
The Audio Adapter board is a bit overkill for our purposes. We don't need headphone outputs, we don't need stereo sound, and we probably don't need the majority of the signal processing capabilities. We do need however to drive a speaker and that requires yet another chip. However it would not be hard to create our own board with the SGTL5000, SD card, and a small Class D IC.
While I am still very "green" and a long way from catching up to you on this project in terms of overall understanding a thought does occur to me. Given the flexibility that you are striving for with the project I might suggest not discarding the stereo option out of hand. For instance, you can actually use a stereo system to play "split tracks" that could be used to play two different sounds (in terms of a left and right speaker). So, in the case of our tanks, I could perceive one speaker playing an engine sound channel (with everything from idle to acceleration/deceleration) and the other channel playing overlap audio for brakes, gun fire, track sounds, etc. One thing I notice with my tanks is that each sound plays exclusive of the other sounds (so the engine sounds are suspended when the gun fires, etc). Using the Stereo channels to seamlessly interlace audio would allow for a much richer sound experience. From a hardware standpoint, unless looking to use bridged mono, this approach would also require the second speaker and enough energy to drive both. However even this it isn't a zero sum option. The stereo logic circuitry provide some interesting capabilities whether using one or more speakers (as long as we know what the capabilities of the speakers are). Of course, less elegant options are out there but they would require much more sound data (thus more memory) to provide a "smoothness" to overlapped audio. Once again, it has been a very long time since I did any serious work in audio so forgive me if anyone finds myself rambling. If such is the case all I can do is apologize. I've discovered that many of my thoughts end up being casualties of a tired mind.
22
« on: January 15, 2017, 05:29:31 PM »
You are quite right about Qt. I'll need a few more quiet hours to get it configured the way I want. I'll heed your advice and read through the class synopsis. I primarily just wanted to get all of the IDE's set up and be in a position where I can compile all of the code at any time. Once that is done then I won't have to worry about it once I get a TCB to play with. The time between now and then will mostly be reading and learning the codebase. I took my son out today and ran the tanks for a few hours. What's the point of all this if I don't actually run our tanks! lol. The one thing that struck me again was just how "coarse" the turret control is on the stock units. I will definitely want to find improvements with turret and gun elevation control. I really like both of these tanks but the Sherman 75 has been a real "diva" right out of the box. If it isn't one thing it is another with this beast. The Panther has one paint chip. That's it. The Sherman, on the other hand, has been a tease. I swear it has a personality. Today it developed a strange mechanical "squelch" when turning left. Checked the gearbox and didn't seem to find anything seized up but will have to go over to RC Universe or email Erik to see if anyone has any ideas about it. Truth be told, I wouldn't send the tank back or sell it. For some reason all of the little problems it has so far presented to me have somehow made it more endearing. Strange.
23
« on: January 15, 2017, 10:35:12 AM »
Whew! I had forgotten how long it took to install the Qt IDE! . If you don't mind sharing I'd be curious to know what sort of embedded work you have done. With any sort of formal education, or even just the long experience you possess, my coding practices may seem unusual - or maybe not, I guess I don't know. I often wonder if I've missed context, perspective or sense of proportion from self-education, but it's hard to know what you missed if you don't what you missed!
Well it is a long sordid history I suppose.  I started out back in the 80's writing code for scientific analysis and some very early robotics. After college, I moved into aerospace and automotive engine controls focusing on layered communications throughout the 90s. For the next decade or so I moved around the medical device industry which involved numerous motor and sensor controls. Currently I am mostly just lifting legacy code (mostly my own) up through the ages trying to keep the energy sector paced with advances in technology. I wouldn't worry too much about your "coding practices" as that tends to be very objective by whomever is working with it. Everyone has their own background and experiences through which they see the world. I figure as long as it is clean and well documented (which yours appears to be) then I would have no worries. Besides, the project is a work-in-progress and now open source which should bring many positive elements to it. I am sure that as more folks get involved there will be much to grow upon but I suspect the bulk of your original work will remain the solid platform you developed by yourself. I salute your perseverance getting it this far. Personally, I have way too many projects sitting on the shelf that never made it anywhere close to the functionality you have achieved so good job!.
24
« on: January 14, 2017, 04:42:10 PM »
Just taking a few moments to step back and take stock of where I am (or think I am) with this project. This is mostly for me to simply get my thoughts in order since I am barrel rolling into this project and a new hobby at the same time. If I have glaringly missed something important feel free to chime in! - Download and install FTDI Virtual COM Port (VCP) drivers: Downloaded but waiting for TCB before installing.
- Download and install OPConfig: Complete!
- Download and installed Arduino IDE to review, edit and compile TCB firmware: Complete!
- Download and installed Arduino IDE plugin for Visual Studio (to make my life easier since I am already using VS2015): Complete!
- Download and compile OPConfig source code to review from GitHub: Still looking around for my old Qt license!
- Download and compile TCB Firmware and Bootloader: Complete!
- Identify and acquire a suitable test bed: Complete!1 (Thank you Erik!)
- Identify and acquire Electronic Speed Controller (ESC): Complete!2
- Identify and acquire Sound Unit: Still researching Benedini TBS Mini and possible vendors.*
1 S&D Taigen Tiger I Early Version (Plastic Edition) with IR, 360 Turret Rotation, 3:1 Metal Gearbox, Smoke, Recoil and Lights. 2 Sabertooth Dual 5A 6V-18V Regenerative Motor Driver Serial ESC until the Scout ESC becomes available. *Still looking for a US Vendor for Benedini products but may just order direct if it comes down to it. I am still pondering what might be needed for TCB sound development and the Benedini Mini is as good a place to start as any I suppose.
25
« on: January 14, 2017, 10:34:43 AM »
With the newly absorbed knowledge gleaned from the notes on GitHub I have successfully verified and compiled the TCB code as well as exported a compiled binary. Huzzah! It's amazing what can get done if you actually stop to read the instructions... Now I can spend some time studying the code logic and understanding the process flow. I decided a couple of days ago that I didn't want to relegate my new Panther or Sherman to R&D duties. Therefore it became necessary to find an adequate test bed. Lo and behold. Yesterday, I find new additions to the scratch and dent section for sale on the Taigen Tanks website! A second Huzzah is order! 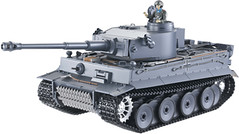 My son desperately wanted a Tiger I so this should work out perfectly. I ordered the IR plastic edition model that was listed thinking it would be perfect for indoor testing. Eventually I will get the metal wheels and metal tracks to upgrade the vehicle but, for now, the plastic edition should meet my future OP needs. It will also give me a good chance to brush off my painting skills because he wanted a replica of Tiger 131. Surely it won't be difficult going from dark grey to desert yellow right?
26
« on: January 14, 2017, 09:24:23 AM »
vonT, try reading through again the introductory section of the GitHub page where you downloaded the project: GitHub TCB. The reason Arduino is giving you errors when compiling is that it thinks you are trying to compile for the "Genuino Uno" board, but the code is designed for the TCB board. The TCB is based on the Arduino Mega board which uses a different processor. So in the Arduino IDE go to the Tools menu, then Boards, then select Arduino Mega, and it should compile. [/li][/list]
Thank you! That's what I deserve for just downloading the zip file. I didn't even go to GitHub to read the notes until now. lol As for inserting hyperlinks into your posts - for security reasons this forum (and all other forums) ignore HTML. Instead the forum uses something called BBC, which stands for Bulletin Board Code. So rather than using html tags, to insert a hyperlink do this instead: Google. Then the forum will render it as Google.
And thank you again! I just have to go back another few years and pull out my old bulletin board memories from the 90s.  Well I did state that I was just stumbling into this.... I have become a digital dinosaur.... 
28
« on: January 13, 2017, 07:06:03 PM »
The Arduino 1.8.1 IDE ( Integrated Development Environment for the uninitiated) is now installed and running. I have copied the contents of OpenPanzerProject-TCB-2da5dca.zip into the Arduino folder that was created in my documents folder and proceeded to open an Arduino sketch (which in my mind is just another name for project). Opening the most logical .ino file (OpenPanzerTCB) went well. It appears that opening any .ino file that was in the folder will load the rest automatically. Fair enough. Everything seems intuitive and straightforward. I will go ahead and select Verify/Compile from the Sketch menu on the toolbar..... Compiling proceeds smoothly up and until.... After several files compile I start getting an errors that several definitions are not declared in scope. I'll start digging into this condition. I've likely not properly configured the compiler. Will be back as soon as I figure this out! ^
Arduino: 1.8.1 (Windows 10), Board: "Arduino/Genuino Uno"
===================I have deleted many lines from the error message to only show the last few lines . ---------------
Utilities:548: error: 'pgm_read_byte_far' was not declared in this scope
varType = pgm_read_byte_far(pgm_get_far_address(STORAGEVARS) + (i*5) + 4); ^
exit status 1
'Serial1' was not declared in this scope
29
« on: January 13, 2017, 06:45:05 PM »
Now before I get too far ahead of myself I just want to explain that all I am attempting to do right now is familiarize myself with the hardware and software as well as get set up to "hit the ground" running once the TCB is actually available. So please bear with me as I fully expect to run into a few "bumps" along the way. It is my hope that, while getting guidance from the developer, my posts may also smooth the way for others that join the adventure at a later time. BTW. If somebody figures out how to embed links in these posts I would really appreciate it. <a href=" http://openpanzer.org/forum/index.php">Open Panzer</a> <--- Yikes. My HTML skills are so lame.... sigh.
30
« on: January 13, 2017, 06:35:16 PM »
Well it seems I have entered into this hobby at an exceptionally interesting time! With the intent of starting a new hobby with my son I recently acquired two new Taigen 1/16 IR tanks (the Panther G and Sherman 75). Even before we opened the tanks on Christmas day I was looking through the vast amounts of forum information at RC Universe and drew the conclusion that I wanted more control of the tanks and how they interact and are controlled. I also quickly realized that Danville VA is a focal point for this hobby and is just up the road from us so having a Tamiya compatible battle system became a desire as well. I wanted to raise and lower the gun via the left control stick and not have it "cycle" up and down ( I would find another switch to actually fire the gun). And from what I read and saw on youtube, I decided that I also wanted more realistic acceleration and deceleration rates. Even having more and better sound options seemed like a good idea. The day came when we finally opened the tanks and it was a blast. I had planned ahead and picked up two 5000mA NiMH batteries and had them charged up to supplement the 2000mA batteries that came with the tanks. Weather permitting, we ran and battled both tanks for many days. I ended up purchasing a quad charger just so I could exercise and keep enough batteries up to continue running! As we played with the tanks I continued reading and learning and just as I was about to put a new wish list together for new hardware somebody said to me " wait a few days for something special". So I did and am very glad I waited. Every time it seems I am ready to look for something new and improved you folks keep delivering. Thank you! And now the Open Panzer project! I haven't been in a R/C hobby for nearly two decades so I am stumbling along a decently sized learning curve trying to catch up with what happened over the years. Fortunately, I have been developing embedded software for the better part of thirty years so I have that going for me. Filling up a forum post with my mostly inexperienced attempts to get what I want might provide a little entertainment to some and perhaps hope to others. I downloaded and installed the Arduino 1.8.0 IDE yesterday only to find an update today. So I will go back and install 1.8.1 and continue my post.
|